Configuring Multiple Displays
| Setting | Default | AWI | OSD | Management Console |
|---|---|---|---|---|
| Enable Configuration | Disabled | |||
| Layout | ||||
| Alignment | ||||
| Primary | ||||
| Position | ||||
| Rotation | ||||
| Resolution |
Depending on the Tera2 PCoIP Zero Client you have, you can attach up to two or four displays to your device. Using the OSD Display Topology page, you can configure the position, rotation, and resolution of the attached displays.
Before you configure multiple displays, make sure your setup has these components
- To apply the display topology feature to a PCoIP session between a client and a VMware Horizon virtual desktop, you must have VMware View 4.5 or higher.
- To apply the display topology feature to a PCoIP session between a client and a PCoIP Remote Workstation Card, you must have the Remote Workstation Card Software installed on the host.
Use the OSD, not the Windows Display Settings, to configure display settings
Always change the display topology settings using the OSD Display Topology page. Don't change these settings from the Windows Display configuration page in a virtual machine when using VMware View.
Configuring Two Displays
If your Tera2 PCoIP Zero Client supports two attached displays, The OSD Display Topology page, as shown next, enables you to configure the display topology for the attached displays.
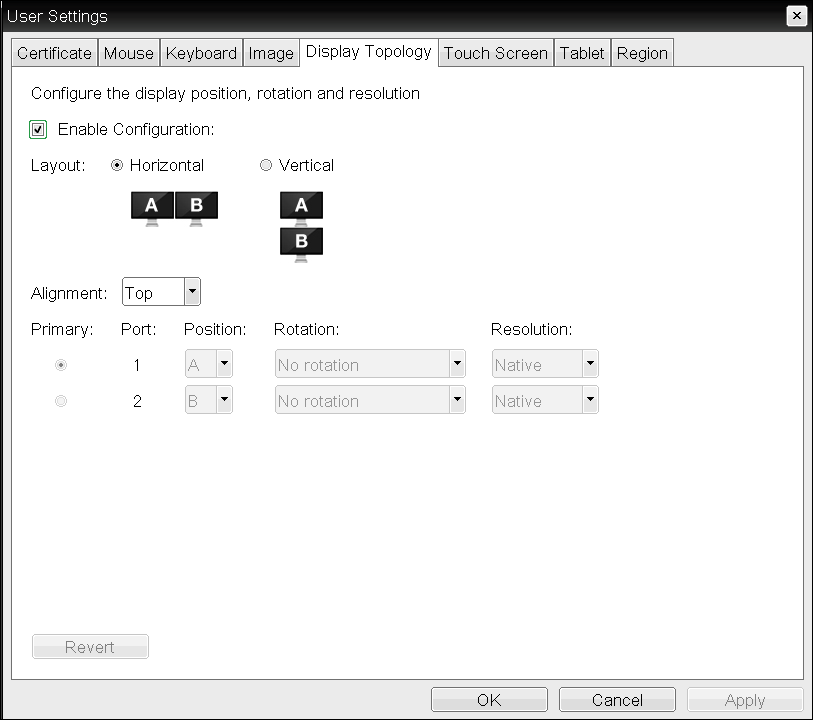
OSD Display Topology page (for two displays)
The following parameters display on the OSD Display Topology page:
Display Topology Parameters (Two-Display Configuration)
| Parameter | Description |
|---|---|
| Enable Configuration | Enable to configure a device that supports two displays per PCoIP chipset. |
| Display Layout | Select the layout for the displays (A and B). This setting should reflect the physical layout of the displays on the desk.
|
| Alignment | Select how you want displays aligned when they are different sizes. Note: This setting affects which area of the screen to use when users move the cursor from one display to the other. The alignment options that appear in the drop-down list depend on the selected display layout. Horizontal layout:
|
| Primary | Configure which video port on the Tera2 PCoIP Zero Client you want as the primary port. The display that is connected to the primary port becomes the primary display (that is, the display that contains the OSD menus before you initiate a PCoIP session and the display that is requested for the Windows taskbar after you initiate the session).
|
| Position | Specify which display is physically connected to each port. |
| Rotation | Configure the rotation of the display in each port:
|
| Resolution | The display resolution can be configured for a PCoIP session between a virtual machine or host and a Tera2 PCoIP Zero Client. The Tera2 PCoIP Zero Client detects the supported display resolutions of the monitor and populates them to the drop-down menu. By default, the display’s native resolution is used. |
To configure display settings:
- From the OSD, select Options > User Settings > Display Topology.
- From the OSD Display Topology page, configure the settings for the attached displays.
- Click OK.
Configuring Four Displays
If your Tera2 PCoIP Zero Client supports four attached displays, The OSD Display Topology page, as shown next, enables you to configure the display topology for the attached displays.
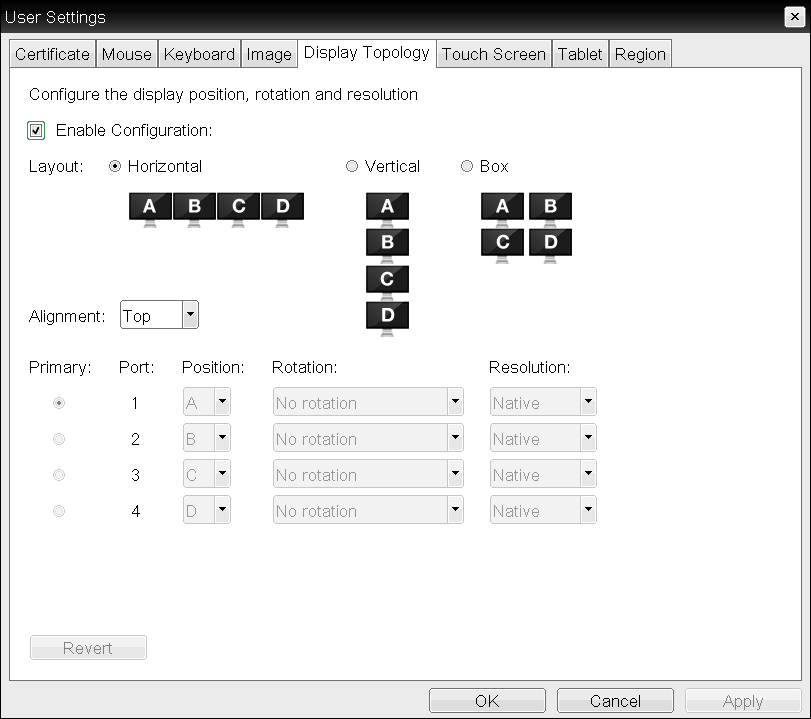
OSD Display Topology page (for four displays)
The following parameters display on the OSD Display Topology page:
Display Topology Parameters (Four-Display Configuration)
| Parameter | Description |
|---|---|
| Enable Configuration | Enable to configure a device that supports four displays per PCoIP chipset. |
| Display Layout | Select the layout for the displays (A, B, C, and D). This setting should reflect the physical layout of the displays on the desk.
|
| Alignment | Select how you want displays aligned when they are different sizes. This setting affects which area of the screen to use when users move the cursor from one display to the other. The alignment options that appear in the drop-down list depend on the selected display layout. Horizontal layout:
|
| Primary | Configure which video port on the Tera2 PCoIP Zero Client that you want as the primary port. The display that is connected to the primary port becomes the primary display (that is, the display that contains the OSD menus before you initiate a PCoIP session and the display that is requested for the Windows taskbar after you initiate the session).
|
| Position | Specify which display is physically connected to each port. |
| Rotation | Configure the rotation of the display in each port:
|
| Resolution | The display resolution can be configured for a PCoIP session between a virtual machine or host and a Tera2 PCoIP Zero Client. The Tera2 PCoIP Zero Client detects the supported display resolutions of the monitor and populates them to the drop-down menu. By default, the display’s native resolution is used. |
To configure display settings:
- From the OSD, select Options > User Settings > Display Topology.
- From the OSD Display Topology page, configure the settings for the attached displays.
- Click OK.