PCoIP Zero Client Quick Start Guide
ESTABLISHING A PCoIP CONNECTION
Your PCoIP Zero Client is pre-configured to connect directly to a PCoIP Remote Workstation Card, but can be configured to use a third party connection broker such as VMware Horizon to connect to virtual desktops or PCoIP Remote Workstation Cards. You can also connect to Teradici Cloud Access Agents.
DIRECT CONNECT TO THE REMOTE WORKSTATION CARD
-
Power on host PC with PCoIP Remote Workstation Card.
-
Power on the Zero Client and the connected displays.
-
Ensure the Zero Client is on the same network as the Remote Workstation Card.
-
Wait until the Connect dialog appears on screen.
-
Select Connect and you will see the message Discovering hosts, please wait….
-
A list of available hosts is displayed.
-
Select the Remote Workstation Card you wish to connect to and click OK.
-
The display will show the host PC screen and the Zero Client’s Session LED on the front panel will turn green indicating a successful PCoIP connection.
DIRECT CONNECT TO A TERADICI CLOUD ACCESS AGENT
-
Power on a host PC with Cloud Access Agent installed. (Standard Agent or Graphics Agent).
-
Power on the Zero Client and the connected displays.
-
Wait until the Connect dialog appears on screen.
-
Browse to the OSD Session Page (Options > Configuration > Session)
-
Change the Session Connection Type to Auto Connect and enter the IP address of the host PC.
-
Select OK and then Connect.
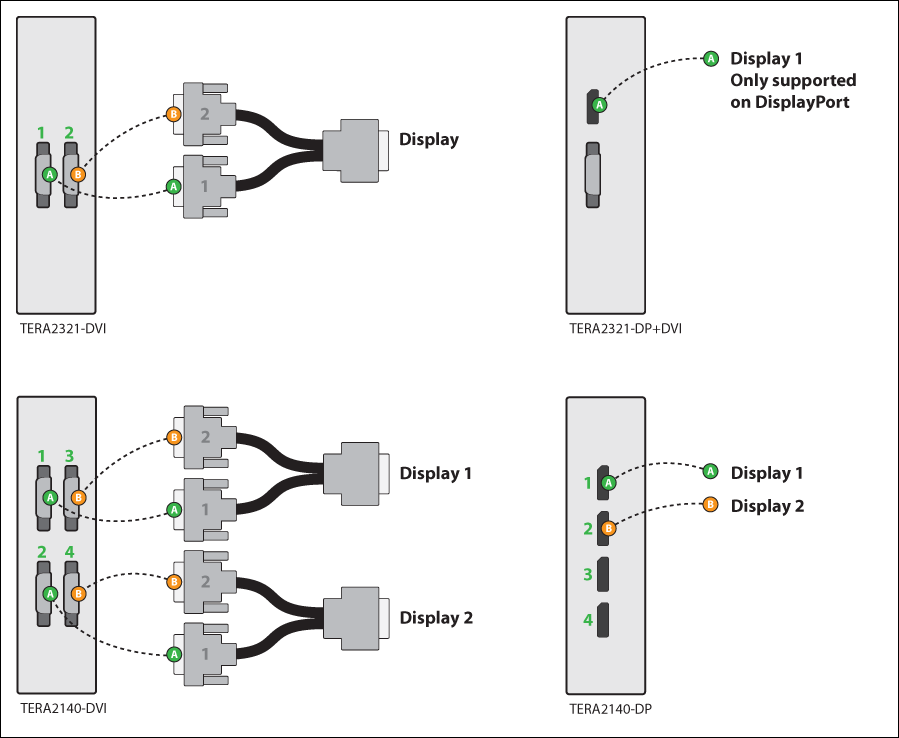
INSTRUCTIONS FOR 2560X1600 / 3840x2160 RESOLUTION MONITORS
(Only DisplayPort models support 3840x2160 (4K UHD) resolution)
LED STATUS INDICATORS
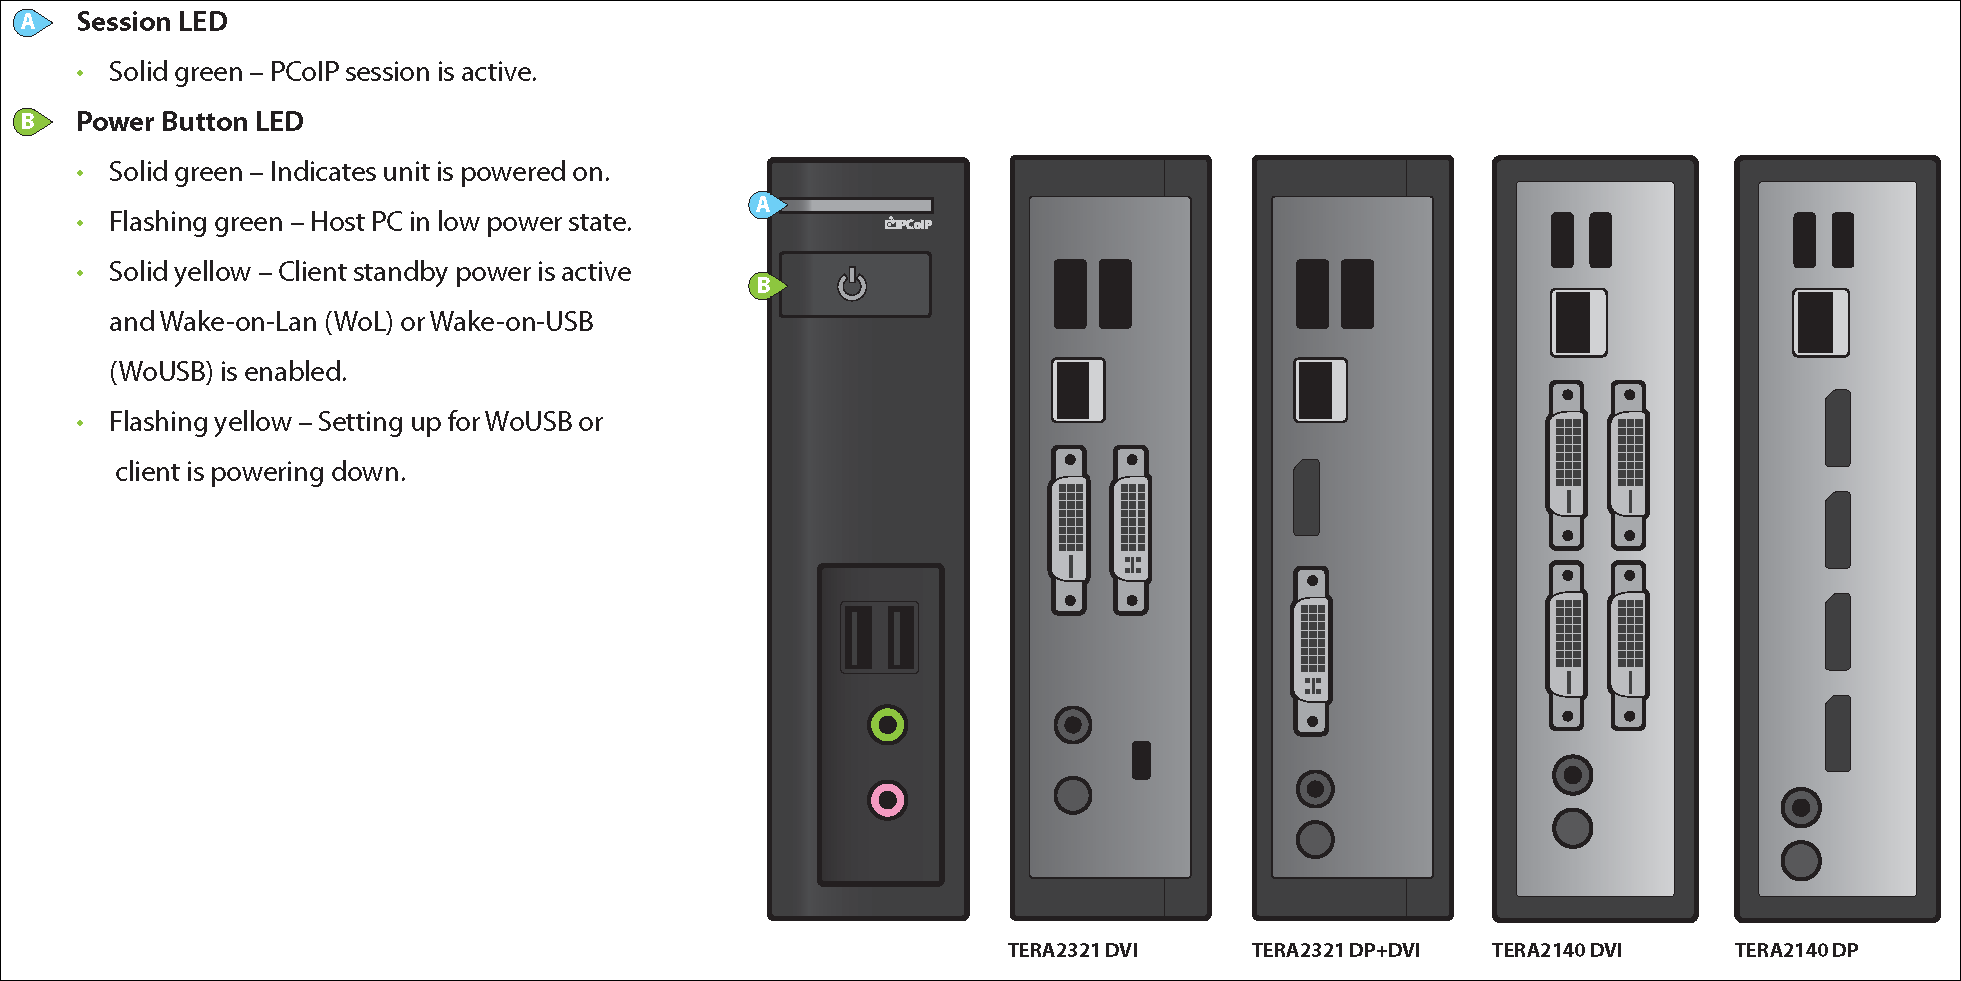
Session LED
-
Solid green – PCoIP session is active.
-
Power Button LED**
-
Solid green – Indicates unit is powered on.
-
Flashing green – Host PC in low power state.
-
Solid yellow – Client standby power is active and Wake-on-Lan (WoL) or Wake-on-USB (WoUSB) is enabled.
-
Flashing yellow – Setting up for WoUSB or client is powering down.
INSTALLATION STEPS
- Connect USB keyboard and mouse.
- Connect one end of the Ethernet cable to the zero client and the other end to a switch/router. The switch or router should be on the same network as the Remote Workstation Card or virtual desktop server.
For more advanced network environments, visit the Teradici Support Site - Connect monitor cables to the zero client.
- Connect speakers and/or headphones (optional).
- Connect power supply to the zero client and a power source.
- Press front panel button to power on the zero client.
BUTTON OPERATION
- Press to turn on (when off or in WoL/WoUSB suspend mode)
- Press and hold to turn off
- When in-session
- When connected to a virtual desktop - Press to disconnect.
- When connected to a PCoIP Remote Workstation Card - Press to show zero client control panel with options to disconnect, or power off the workstation.
RESOLUTION OPTIONS
Model TERA2321 DVI
- 1-2 DVI monitors up to 1920x1200
- 1 DVI + 1 VGA monitor up to 1920x1200
- 1 DVI monitor up to 2560x1600*
Model TERA2321 DP+DVI
- 1 DisplayPort + 1 DVI or VGA monitor up to 1920x1200
- 1 DisplayPort monitor up to 3840x2160
Model TERA2140 DVI
- 1-4 DVI monitors up to 1920x1200
- 1-2 DVI monitors up to 2560x1600
- 1-2 DVI monitors up to 1920x1200 + 1 DVI monitor up to 2560x1600
Model TERA2140 DP
- 1-4 DisplayPort monitors up to 1920x1200
- 1-2 DisplayPort monitors up to 3840x2160
- 1-2 DisplayPort monitors up to 1920x1200 + 1 DisplayPort monitor up to 3840x2160
RESOURCES
Available at the Teradici Support Site:
MODELS
-
TERA2321 DVI Dual Display PCoIP Zero Client
-
TERA2321 DVI+DP Dual Display PCoIP Zero Client
-
TERA2140 DVI Quad Display PCoIP Zero Client
-
TERA2140 DP Quad Display PCoIP Zero Client