Setting Up a Touch Screen Display
This topic explains how to install and configure an Elo TouchSystems touch screen display for your Tera2 PCoIP Zero Client. You'll learn how to:
- Install an Elo TouchSystems touch screen display (see Installing the Touch Screen Display).
- Configure and calibrate settings for an attached Elo TouchSystems touch screen display (see Configuring the Touch Screen from the OSD).
- Configure the firmware if you want the touch screen to be controlled by a driver running on the host (see Setting up the Touch Screen as a Bridged Device)
- Set up auto-logon to bypass authentication when users are connecting to a host with a broker (see Configuring the Tera2 PCoIP Zero Client to Automatically Log into a Host Brokered by a Connection Manager).
Installing the Touch Screen Display
The following procedure shows you how to Install an Elo TouchSystems touch screen display.
To install an Elo TouchSystems touch screen display:
- Plug in the touch screen’s USB cable to the Tera2 PCoIP Zero Client’s USB port.
-
Attach the monitor cable from the touch screen to any port on the Tera2 PCoIP Zero Client.
Don't attach multiple touch screens to the PCoIP Zero Client
You can't attach multiple touch screens to the Tera2 PCoIP Zero Client, but you can attach additional non-touch screens to the Tera2 PCoIP Zero Client in addition to the touch screen as long as the touch screen is attached to the port on the Tera2 PCoIP Zero Client that is configured as the primary port.
-
Plug in the power.
-
Disconnect the Tera2 PCoIP Zero Client session. This initiates the calibration on the touch screen.
Touch screen's co-ordinates are saved in flash memory
Once the touch screen is calibrated, the co-ordinates are saved in flash memory. You can manually recalibrate the screen as required through the OSD Touch Screen page.
-
Follow the touch screen prompts. You can test the calibration with your finger (the cursor should move with your finger). If the screen is not properly calibrated, the system automatically restarts the calibration program.
Configuring the Touch Screen from the OSD
| Setting | Default | AWI | OSD | Management Console |
|---|---|---|---|---|
| Enable right click on hold | Disabled | |||
| Right click delay | Set for a shorter delay | |||
| Touch screen calibration (N/A; You must press Start to begin calibration) |
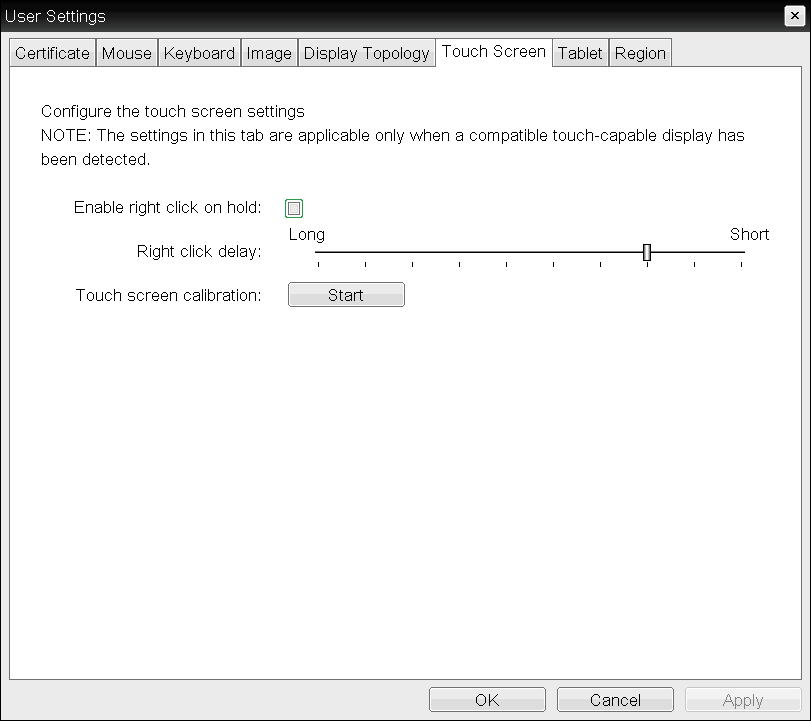
The OSD Touch Screen page, as shown next, enables you configure and calibrate settings for an attached Elo TouchSystems touch screen display.
OSD Touch Screen page
Supported touch screens
Elo IntelliTouch and Elo AccuTouch are the only Elo TouchSystems touch screens supported.
The following parameters display on the OSD Touch Screen page.
OSD Touch Screen Parameters
| Parameter | Description |
|---|---|
| Enable right click on hold | Select this check box to let users generate a right-click when they touch the screen and hold it for a few seconds. If disabled, right-clicking is not supported. |
| Right click delay | Slide the pointer to the position (between Long and Short) to determine how long the users must touch and hold the screen to generate a right-click. |
| Touch screen calibration | When you first connect the touch screen to the Tera2 PCoIP Zero Client, the calibration program starts. At the touch screen, touch each of the three targets as they appear. To test the calibration, run your finger along the monitor and ensure that the cursor follows it. If it is not successful, the calibration program automatically restarts. Once calibrated, the coordinates are stored in flash. To manually start the calibration program, from the OSD Touch Screen page, click Start. Follow the onscreen prompts. |
To configure a touch screen from the OSD:
- From the OSD, select Options > User Settings > Touch Screen.
- From the OSD Touch Screen page, update the touch screen settings.
- Click OK.
Setting up the Touch Screen as a Bridged Device
Setting up a touch screen as a bridged device is optional
This procedure is optional and only necessary if you want the touch screen to be set up as a bridged device.
While a session is active a user may want the touch screen to be controlled by a driver running on the host. To set this up the touch screen must be added to the list of bridge devices.
To set up the touch screen as a bridged device:
- Install the touch screen to your Tera2 PCoIP Zero Client (see Installing the Touch Screen Display).
- Log into the Tera2 PCoIP Zero Client AWI.
-
From the AWI Info menu, click Attached Devices. The Attached Devices page displays (as shown next), showing the PID and VID information.
VID and PID numbers
Write down the PID and the VID information. From the Permissions menu, click USB to display the USB permissions page. In the Bridged Devices section, click Add New. Enter the Vendor ID and Product ID for the touch screen (as shown next), and then click Add.
USB permissions page
Restart the Tera2 PCoIP Zero Client session. Install the touch screen driver from Elo TouchSystems. See the Elo TouchSystems documentation for installation and calibration instructions.
Configuring the Tera2 PCoIP Zero Client to Automatically Log into a Host Brokered by a Connection Manager
To make logging into the touch screen device easier, you can configure auto-logon to bypass the keyboard when using a broker as a connection manager.
If you choose to set this up, users simply need to touch Connect at the Login window instead of also having to enter their login credentials.
To configure the Tera2 PCoIP Zero Client to automatically log into a host brokered by a connection manager:
- Log into the AWI for the Tera2 PCoIP Zero Client.
- From the Configuration menu, select Session.
- In the Session Connection Type drop-down menu, select PCoIP Connection Manager + Auto-Logon or View Connection Server + Auto-Logon, depending on the connection server you're using.
- Enter the connection server’s DNS name or IP address.
- Complete the user credentials, and then click Apply.