Creating a Deployment
The following section outlines how to create a deployment using the Cloud Access Manager Admin console:
-
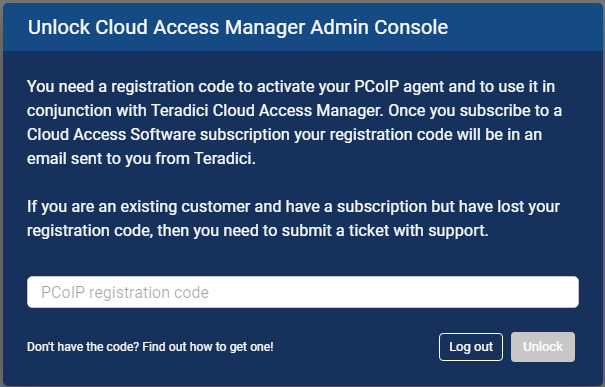
If you do not have any existing deployments (first time log-in) you will be prompted to enter your Cloud Access Software registration code. Once you enter the code it will automatically generate your first deployment and take you to the Edit Deployment page.
-
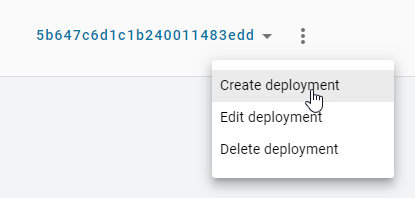
If you have existing deployments you can click Create deployment from the kebab options at the top of the page to take you to the Create Deployment page.
-
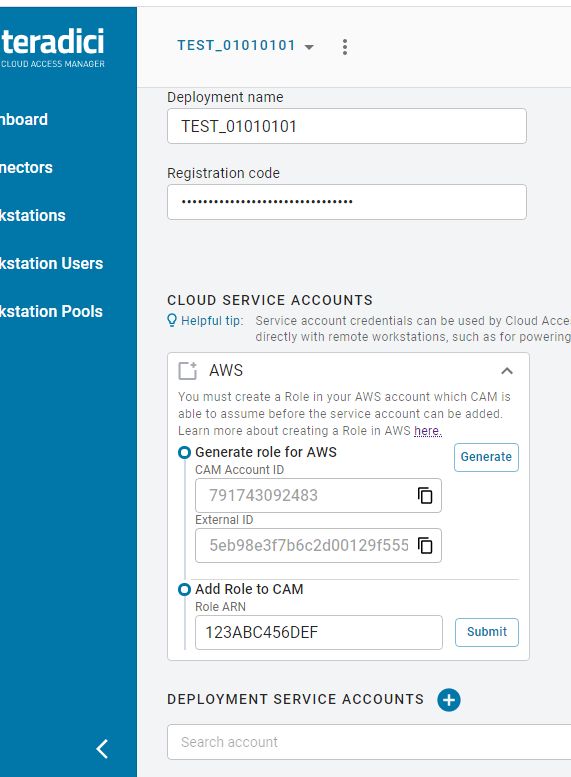
Enter the following information:
- Enter the deployment name.
- Enter your Cloud Access Software registration code.
-
You can optionally enter AWS, Azure, and GCP credentials if you are working in those environments and want to enable Cloud Access Manager to perform certain functions, such as power management. If you are not using AWS, Azure, and GCP then you do not need to enter this information.
Cloud Service Account Credentials
These credentials are used in places where the Cloud Access Manager interacts with your cloud environment to perform actions such as powering a remote workstation on or off. If credentials are not provided, remote workstations in that cloud can still be added to Cloud Access Manager and users can still be entitled to the remote workstation and start a PCoIP session, but Cloud Access Manager cannot perform functions such as power on and off.
Entering these credentials is optional and enables you to access extra functionality and control over the remote workstations within the deployment on the cloud provider of your choice.
Domain Controllers in a Single Deployment
You cannot deploy multiple Cloud Access Connectors against different Domain Controllers within the same deployment. This will cause the Cloud Access Connectors to crash.
AWS Cloud Credentials
Through the Cloud Access Manager Admin Console you can generate a CAM Account ID and Exernal ID that can be used when creating an AWS role through the AWS Management Console.
AWS Role Creation and Permission Policy
You must create a role in your AWS account which Cloud Access Manager is able to assume. You must use the Account ID and External IDs when creating the AWS role. For more information on creating roles in AWS, see here.
-
Once you have entered the CAM Account ID and External ID you will need to create a permissions policy for Cloud Access Manager that contains the following permissions:
- Service: EC2
- Actions:
- List: DescribeInstances
- Write: RebootInstances StartInstances StopInstances TerminateInstances
There are additional permissions needed to verify that the role has all the required permissions before being added to a deployment:
- Service: IAM
- Actions
- List: ListAttachedRolePolicies ListRolePolicies
- Read: GetPolicy GetPolicyVersion GetRolePolicy
The following is an example of how the permissions set should look in a JSON format:
{
    "Version": "2012-10-17",
    "Statement": [
        {
            "Sid": "VisualEditor0",
            "Effect": "Allow",
            "Action": [
                "ec2:RebootInstances",
                "iam:GetPolicyVersion",
                "ec2:DescribeInstances",
                "ec2:TerminateInstances",
                "iam:GetPolicy",
                "ec2:StartInstances",
                "iam:ListAttachedRolePolicies",
                "iam:ListRolePolicies",
                "ec2:StopInstances",
                "iam:GetRolePolicy"
            ],
            "Resource": "*"
        }
    ]
}
If the user tries to add an AWS role that doesn't have these permissions, Cloud Access Manager will still add the role but will not validate that it has the required permissions.
You can now associate a permissions policy to this role.
-
Once you have created the role in AWS, copy and paste the role ARN and enter it into the Role ARN field in the Cloud Access Manager Admin Console.
- Click Submit.
For information on the AWS Service Account roles and permission policies with Cloud Access Manager, see here.
Azure Cloud Credentials
For Azure you need to enter the Tenant ID, Subscription ID, Client ID and Client Secret.
For information on how to create a new Client Secret from Azure, see here.
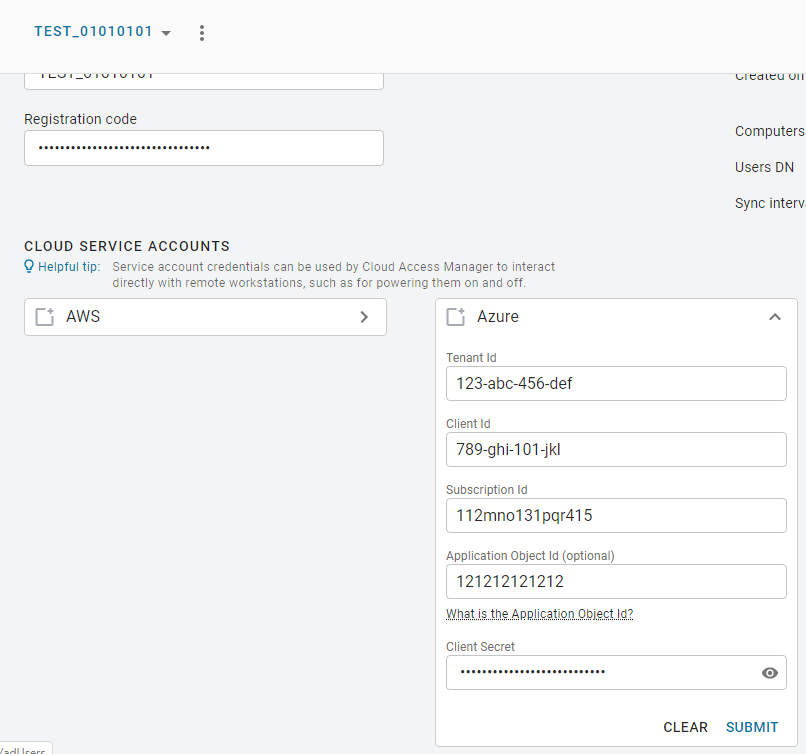
Azure Client Secret
Once you generate the client secret you need to copy it straight away as it will not be available again from Microsoft. If you have an expired client secret you need to delete it and then create a new secret and assign it to that deployment.
For information on the Azure Service Account and permission requirements with Cloud Access Manager, see here.
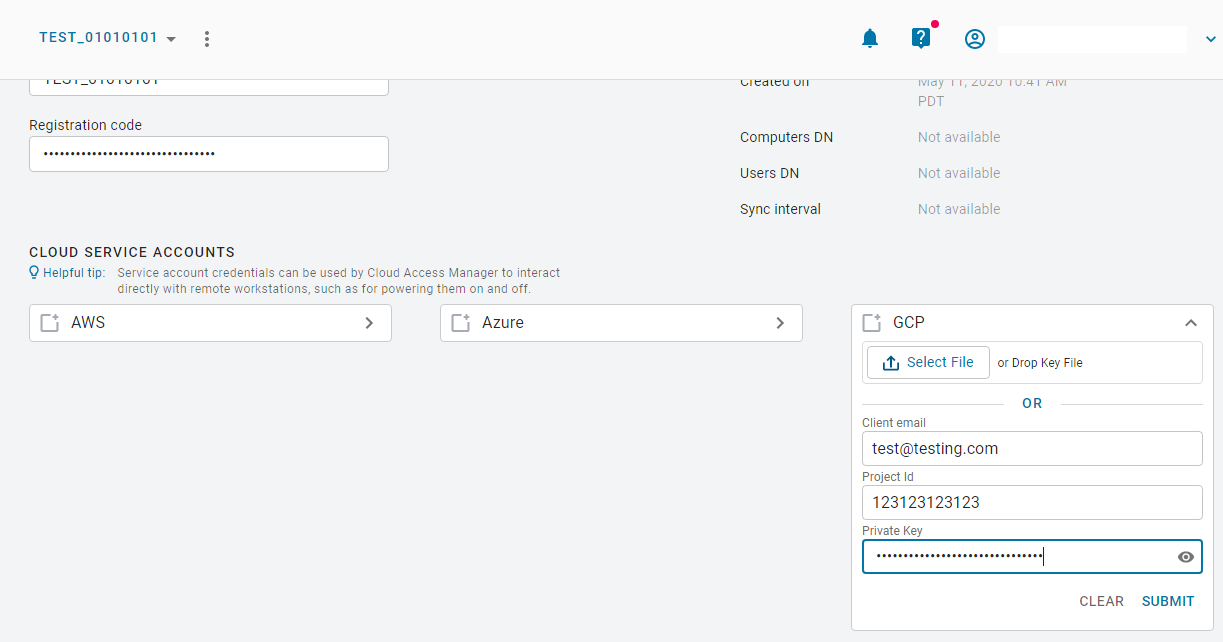
GCP Cloud Credentials
You can enable GCP cloud credentials by entering the GCP client email, Project ID and Private Key and clicking Submit. You can also upload the JSON Key file with the GCP cloud credentials.
For more information on GCP Cloud Service Accounts with Cloud Access Manager, see here.
For information on the GCP Service Account and permission requirements with Cloud Access Manager, see here.
Editing an Existing Deployment
The creation date, computer and users DNs and the interval time in minutes that it syncs with the Active Directory for the deployment are also displayed when you go to edit a specific deployment.
You can search for specific deployments by name by using the search bar in the table toolbar.
You can edit the deployment name, update the registration code and GCP or Azure cloud service account credentials of an existing deployment through the CAM Admin Console. A menu item has been added to the table toolbar that enables you to create, edit, delete and view all existing deployments.
- Click the dropdown from the top of the page and select the deployment.
- Select the deployment and click the kebab option under the ACTIONS column to edit the deployment.
- Update the deployment name, registration code, GCP or Azure credentials and then click SAVE.
The updated information and credentials will now be reflected for the deployment.
Azure Client Secret
Once you generate the client secret you need to copy it straight away as it will not be available again from Microsoft. If you have an expired client secret you need to delete it and then create a new secret and assign it to that deployment.