Installing the Cloud Access Connector on RHEL/Rocky Linux
You can configure the firewall, setup the system, download and install the Anyware connector on RHEL/Rocky Linux. If you are currently using Connector on Ubuntu, it is important to read and understand the differences Connector on RHEL/Rocky Linux introduced, To find out the side by side comparison, see Difference between Cloud Access Connector on Ubuntu and RHEL/Rocky Linux.
Beta Feature
Please be aware that the Cloud Access Connector on RHEL/Rocky Linux is only currently available in a beta version. As such, this feature may change as it is developed, and it will not be supported by Teradici Global Support Services. Features in the beta version are considered not yet ready for full production and you use them at your own risk.
| Items | Connector on RHEL/Rocky Linux |
|---|---|
| Operating System | RHEL/Rocky Linux 8.x |
| Packaging | RPM Package |
| Deployment | Kubernetes |
| Connector Configuration | Configuration files and/or command line flags and parameters. |
| Required Configuration Flags | --token--domain--sa-user--sa-password--accept-policies--self-signed (or --tls-key and --tls-cert must be provided)--ldaps-ca-cert--computers-dn (for the first Connector of the deployment)--users-dn (for the first Connector of the deployment) |
| MFA Configuration | All connection requests both internal and external will require MFA credentials to be entered. |
| AD Synchronization | If computer (--computers-dn) and/or users DNs (--users-dn) parametersare not provided during installation, and no AD configuration is returned from CAS Manager, AD sync will not sync all objects from the AD to the CAS Manager. |
| AD LDAPS Certificate | The AD CA certificate must be provided to the installer by entering the information with the --ldaps-ca-cert parameter or by editing the configuration file. |
| Diagnose Commands | In addition to the diagnose command, you can check the health of the Connector by running the --health command,and can create a support bundle by running the --support-bundle command. |
| Key path and Certificate path flag | --tls-key and --tls-cert |
| Installation Commands | Add the repository and install the Connector RPM with the following command: sudo yum install -y cas-connector. Configure the Connector with flags or configuration files using the following command: sudo /usr/local/bin/cas-connector configure {flags or path to config file}. The configure command will fail with a missing parameter error if the mandatory flags or parameters are missing,the mandatory flags are --token, --domain, -sa-user, --sa-password, --ldaps-ca-cert, --self-signed(or must provide --tls-key and --tls-cert). |
| Update Configuration Files | Update the configuration file or specify flags to be updated: sudo /usr/local/bin/cas-connector configure {flags or path to config file}. |
| Upgrade Commands | sudo dnf update cas-connector and sudo /usr/local/bin/cas-connector upgrade |
| Internal/External Session Detection | In some cases the Connector on RHEL/Rocky Linux will work without any special configuration, but if you know the Connector on RHEL/Rocky Linux is only for WAN connections, it is strongly recommended to set the --internal-client-cidr to "" to avoid issues. In some cases where the Connector on Ubuntu worked without configuring this setting, you may now be required to do so (eg, GCP Network Load Balancer). |
The following sections outlines how to download and install the Connector on Rocky Linux and RHEL. There are five main steps involved in this process:
- Adding the Connector repository
- Configuring the SELinux components
- Installing the RPM
- Generating the Connector Token
- Configuring the Connector.
Prerequisite Steps
For instructions and documentation on the Connector prerequisite steps when installing on RHEL/Rocky Linux, see Connector System Requirements. It is important to read and address all the prerequisites outlined.
Before you begin
If you are currently using the Anyware Connector on Ubuntu, it is important to read and understand what the differences are between the Connector on Ubuntu and Connector on RHEL/Rocky Linux so you can prepare the installation correctly to minimize errors during installation.
For more information, see Difference between Anyware Connector on Ubuntu and RHEL/Rocky Linux
Firewall Configuration
You must ensure your firewall is established and configured properly. Ensure you have port TCP 443 and port TCP/UDP 4172 enabled on the virtual machine that the Connector is running on. Please check Firewall Load Balancing Considerations for additional port and firewall information.
You need to configure the firewall of the virtual network the Connector is running in by following the commands below:
- Login to the Connector virtual machine by ssh from a bash shell as root.
- Check and confirm if firewalld is active by running the following command:
sudo systemctl status firewalld
-
If
firewalldis active, follow the steps outlined below for firewall configuration. Iffirewalldis inactive, and your organization does not require firewall on the Connector virtual machine, then skip the firewall configuration steps below and proceed to the remaining steps. -
Run the following commands to configure the firewall:
sudo firewall-cmd --permanent --add-port=6443/tcp # virtual network flannel
sudo firewall-cmd --permanent --add-port=4172/tcp # PCoIP SG port
sudo firewall-cmd --permanent --add-port=4172/udp # PCoIP SG port
sudo firewall-cmd --permanent --zone=trusted --add-source=10.42.0.0/16 # This subnet is for the pods
sudo firewall-cmd --permanent --zone=trusted --add-source=10.43.0.0/16 # This subnet is for the services
sudo firewall-cmd --reload
1. Adding the Connector Repository
The virtual machine you are adding the repo to must have access to the internet. If it doesn't, you will be unable to download and install the required files.
To access the scripts and to configure and add the RHEL and Rocky Linux repository, select the Downloads and scripts option here and select the Cloud Access Connector (RHEL/Rocky Linux) option. Click Downloads and scripts and copy the script to add the Connector repo.
Once you have copied the curl command you need to run it to download the repository.
2. Configuring SELinux Policies
The following SELinux policies enable persistent storage and container logging on the Connector. If SELinux policies are not found, data stored in the Connector will be lost when the virtual machine is shut down.
Once configured, and the installation has verified SELinux, all Connector related data will persist when the target machine hosting the Connector is re-booted. To check if selinux is already installed on your system, run the following command:
sudo dnf list installed | grep cas-manager-selinux
The output from this command will notify if you if selinux is already running on your system. If it is not then you need to run the following commands to install the SELinux policies:
-
Run the following command to install the SELinux policies and set the basic framework for persistent database and Vault:
sudo dnf install -y selinux-policy-base container-selinux
-
Run the following command to install a specific version of SELinux that has been tested for K3s:
sudo dnf install -y https://github.com/k3s-io/k3s-selinux/releases/download/v1.1.stable.1/k3s-selinux-1.1-1.el8.noarch.rpm
-
Run the following command to install SELinux from the CAS Manager repo:
sudo dnf install -y cas-manager-selinux
3. Installing the Connector RPM
Once you have installed and configured the SELinx policies you must install the Connector RPM and configuration files.
Run the following command to install the Connector RPM, the sample configuration files will be generated once the install is done:
sudo dnf install -y cas-connector
4. Generating a Connector Token
You must generate a Connector token using the Admin Console. The steps outlined below must be performed on the target virtual machine.
You need to create or have created a deployment prior to obtaining a token. For information on how to log into the Admin Console, see Admin Console Connection. The following section outlines how to obtain a Connector token using the Admin Console:
- Click Connectors from the console sidebar.
- Click the add connector button (+ sign located beside Connectors heading) to display the connector creation panel.
- Enter the following information:
- Select the deployment you want to add the Connector to. If you do not have an existing deployment you need to create one.
- Enter the name of the Connector.
- Follow the step by step instructions outlined below.
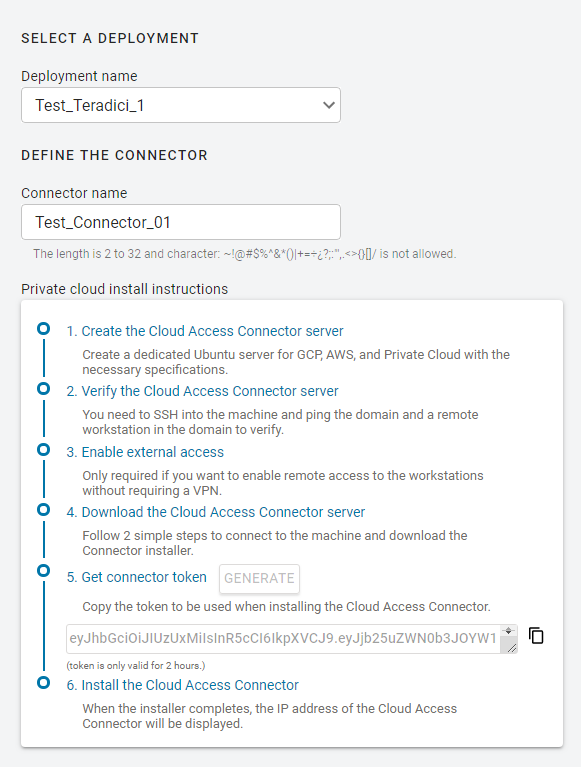
- Click GENERATE.
- Copy the Connector token by click the copy icon.
- Click CLOSE the exit the panel.
You can now use this Connector token when prompted during installation.
5. Configuring the Connector with CAS Manager - Example Commands
The following section provides example configuration commands for configuring the Connector with CAS Manager and CAS Manager as a Service. These example commands use flags, but the same parameters can be configured using the configuration files also.
For information on how to configure the Connector on RHEL/Rocky Linux using the configuration files, see Configuring the Cloud Access Connector with Configuration Files.
Configuring the Connector for CAS Manager
Once you have installed the Connector RPM, and have generated a Connector token from the CAS Manager installed in your enterprise network, run the following commands to configure the Connector to work with the CAS Manager in your enterprise network. The first line of this command maps the Connector token to a variable in the shell:
export token=<token from CAS Manager admin console>
sudo /usr/local/bin/cas-connector configure \
--casm-url=https://ip-address-of-cas-manager \
--token $token \
--domain myexample.com \
--sa-user AD-service-account-user-name \
--sa-password AD-service-account-password \
--ldaps-ca-cert PEM-formatted-CA-certificate-for-the-connection-to-AD-over-LDAPS \
--external-pcoip-ip public.ipv4.clients.connect.to \
--self-signed \
--accept-policies \
--casm-insecure
- When you are installing the Connector for CAS Manager you need to ensure that you enable and specify the
--casm-urlflag. This flag specifies the CAS Manager URL that the Connector connects to. If it is not specified by default it will point to https://cas.teradici.com. - The
--external-pcoip-ipflag is highly recommended to use in order to explicitly set the public IP that PCoIP Clients will connect to during PCoIP sessions. This is the public IP that the Connector is listening to on port 4172. The installer will reach out to cas.teradici.com and first try to automatically resolve the external IP; if this fails, or is not able to resolve the correct IP, this flag is required. In the case that the Connector machine doesn't have an internet connection, for example in a dark site environment, or the ingress and egress internet traffic are running through different public IPs, this flag is required. - The
--casm-insecureflag is only required when the Connector is connecting to a CAS Manager that is using self-signed certificates. If CAS Manager is using trusted TLS certificates signed by a public CA, then users will not need to use the--casm-insecurecommand. - The
-casm-ca-certflag can used to provide the PEM formatted public certificate for the private CA used to sign the CAS Manager certificate. This flag is required when CAS Manager is using a custom certificate that is not signed by a public CA. - If this is the first Connector installed in the deployment, use
--computers-dnand/or--users-dnflags to sync AD objects to CAS Manager. The additional Connector in the same deployment will be able to pull the DN(s) configuration from CAS Manager without needing to provide these flags. - If
--self-signedflag is not used, you must use--tls-keyand--tls-certflags to provide the full path and filename of the TLS key and PEM formatted TLS certificate to use.
Ensure that you use the options and flags that best suit your system architecture and requirements. If required values are not provided on the command line, you will be prompted for them. For additional flags and options, see Installation Flags and Options.
Configuring the Connector for CAS Manager as a Service
Once you have installed the Connector RPM, and have generated a Connector token from the CAS Manager as a Service, run the following commands to configure the Connector to work with the CAS Manager as a Service. The first line of this command maps the Connector token to a variable in the shell:
export token=<token from CAS Manager Admin console>
/usr/local/bin/cas-connector configure \
--token $token \
--domain myexample.com \
--sa-user AD-service-account-user-name \
--sa-password AD-service-account-password \
--ldaps-ca-cert PEM-formatted-CA-certificate-for-the-connection-to-AD-over-LDAPS \
--accept-policies \
--self-signed
- If this is the first Connector installed in the deployment, use
--computers-dnand/or--users-dnflags to sync AD objects to CAS Manager. The additional Connector in the same deployment will be able to pull the DN(s) configuration from CAS Manager without needing to provide these flags. - The
-casm-ca-certflag can used to provide the PEM formatted public certificate for the private CA used to sign the CAS Manager certificate. This flag is useful if the Connector fails to fetch a certificate from the CAS Manager. - If
--self-signedflag is not used, you must use--tls-keyand--tls-certflags to provide the full path and filename of the TLS key and PEM formatted TLS certificate to use.
Ensure that you use the options and flags that best suit your system architecture and requirements. If required values are not provided on the command line, you will be prompted for them. For additional flags and options, see Installation Flags and Options.
Cloud Access Connector - Troubleshooting
If there is an issue installing the Cloud Access Connector or an existing Connector is failing, please see the troubleshooting section on Cloud Access Connector Connectivity. Within this section there are steps to check the following:
- Remote Workstation connections
- Active Directory connections
- Cloud Access Connector component information
You can also view the following KB article here which provides a list of troubleshooting steps for common issues related to installing the Connector. For information on installer errors related to a change in the distribution system, see Installer Issues.
Multi-Factor Authentication
When you enable MFA for the Connector for RHEL/Rocky Linux, all PCoIP Clients authenticated through the Connector will be prompted to enter MFA credentials. Previously, only the external PCoIP Clients were prompted for MFA information
When installing the Connector you can enable multi-factor authentication (MFA) by running the ‑‑enable‑mfa flag. MFA will be disabled by default. If you want MFA to only apply to external connections, you should have separate Connectors. One Connector should be for external connections, where MFA is enabled, and one for internal or direct connections, where MFA is disabled. For steps on how to install the Connector with MFA bypassed for internal connections, see Installing the Connector for Internal Connections.
For external facing Connectors you should apply firewall and network settings, such as placing it in a DMZ for example. For external facing Connectors, ensure that you set --external-client-cidr to 0.0.0.0/0 so that everything through this Connector is treated as an external connection. It is not recommended to rely on the IP range to manage authentication levels, and for better security you should use separate Connectors.
Ensure that you use the options and flags that best suit your system architecture and requirements. If required values are not provided on the command line, you will be prompted for them. For additional flags and options, see Installation Flags and Options.
Installation Flags and Options
For detailed information on the installation flags and the configuration file parameters that you can pass during installation, see the table outlined below:
| Configuration File Parameter* | Type | Description |
|---|---|---|
| casManager | ||
| caCertPath | --casm-ca-cert |
Enables users to supply a CA certificate for CAS Manager to enable the Connector to trust the certificate in order to connect to the CAS Manager instance. |
| insecure | --casm-insecure |
This flag is required when the Connector is connecting to a CAS Manager instance that is using self-signed certificates, and you want to turn off the verification of the certificate. |
| url | --casm-url |
This flag is required for CAS Manager, Specifies the CAS Manager URL that the Connector connects to. If this is not specified it will point to https://cas.teradici.com by default, which is the URL for CAS Manager as a Service. |
| casConnector | ||
| acceptPolicies | --accept-policies |
Automatically accept the EULA and Privacy Policy. |
| token | --token(-t) |
Required. The token generated from CAS Manager for Connector to create a service account to connect to CAS Manager. |
| httpsProxy | --https-proxy |
Specify the URL for a HTTPS proxy (overrides related proxy settings in environment variables). |
| casConnector/tls | ||
| selfSigned | --self-signed |
This mode is not secure and intended for testing only. PCoIP client will receive a untrusted warning when connecting to the Connector. The previous --insure flag is still supported |
| keypath | --tls-key |
The full path and filename of the TLS key to use. The --self-signed flag overrides this flag.A string parameter. |
| certPath | --tls-cert |
The full path and filename of the TLS certificate (in PEM format) to use. The --self-signed flag overrides this flag.A string parameter. |
| casConnector/connector | ||
| externalClientCidrs | --external-client-cidr |
The CIDR for PCoIP Clients that connect to remote workstations through the Security Gateway. If external CIDRs settings are set, internal settings must be explicitly set. It is possible to specify multiple --external-client-cidr networks. A string parameter. |
| internalClientCidrs | --internal-client-cidr |
The CIDR for PCoIP Clients that connect to remote workstations directly. It is possible to specify multiple --internal-client-cidr networks. A string parameter. |
| ip | --external-pcoip-ip |
Sets the public IP for PCoIP Client to PCoIP Agent connection. This is the public IP that the Connector is listening to on port 4172. The installer will reach out to cas.teradici.com and first try to automatically resolve the external IP; if this fails, or is not able to resolve the correct IP, this flag is required. In the case that the Connector machine doesn't have an internet connection, for example in a dark site environment, or the ingress and egress internet traffic are running through different public IPs, this flag is required. For more information on external network access, see Enabling External Network Access. A string parameter. |
| licenseServerUrl | --local-license-server-url |
Lets the URL for PCoIP License Server to be used for PCoIP Sessions. If this is not provided, ensure that the Cloud License Server is registered on the PCoIP Agent. Example: --local-license-server-url http://10.10.10.10:7070/request. For more information on the PCoIP License Server, see PCoIP License Server. A string parameter. |
| retrieveAgentState | --retrieve-agent-state |
Enables the broker to retrieve the agent state for unmanaged and managed remote workstations. The default value for this flag is false. The available states are In Session, Ready, Starting, Stopping, Stopped and Unknown. The value of this flag can either be true or false. A boolean parameter. |
| showAgentState | --show-agent-state |
Controls if the agent state is displayed as part of the remote workstation name in the PCoIP Client. The default value for this flag is true. Setting the value of this flag to true and the --retrieve-agent-state flag to false will result in no agent state displaying. A boolean parameter. |
| casConnector/multifactorAuthentication | ||
| enable | --enable-mfa |
Enables multi-factor authentication. Multi-factor authentication will be enabled for all connections, both internal and external. Internal users will be required to enter the multi-factor authentication code for the Connector when connecting to the PCoIP Client. It is recommended to install separate Connectors for internal vs external connections. A boolean parameter. |
| port | --radius-port |
This is the RADIUS server port. If not specified, the default port (1812) is used. If --radius-server is specified, then this flag is optional. A string parameter. |
| server | --radius-server |
The FQDN or IP address of the RADIUS server to use for MFA. This flag is optional. A string parameter. |
| sharedSecret | --radius-secret |
The shared secret used for configuring RADIUS authenticaton. If --radius-server is specified then this flag is required. A string parameter. |
| deployment/domain/DomainName | ||
| name | --domain |
The AD domain that the remote workstations will join. A string parameter. |
| deployment/domain/domainControllers | ||
| domainControllers | --domain-controller |
This flag specifies one or more domain controllers to use with the Connector. To specify multiple domain controllers use the following format: --domain-controller dc1.domain.com, --domain-controller dc2.domain.com, --domain-controller dc3.domain.com. A string parameter. |
| deployment/domain/serviceAccount | ||
| username | --sa-user |
The AD service account username. A string parameter. |
| password | --sa-password |
The AD service account password. A string parameter. |
| deployment/domain/adSynch | ||
| computerdns | --computers-dn |
The base DN to search for computers within AD for AD sync. Can specify multiple DNs with multiple options. Required if this is the first Connector in the deployment. see the differences between the Connectors at the top of this page for details. Newly provided base DN(s) will automatically replace previous base DN(s). |
| computerfilters | --computers-filter |
The filter to search for computers within Active Directory. Specify multiple filters with multiple options. Default computer filter: (&(primaryGroupID=515)(objectCategory=computer)). A string parameter. |
| usersdns | --users-dn |
The base DN to search for users within AD. Specify multiple DNs with multiple options. Newly provided base DN(s) will automatically replace previous base DN(s). The base DN to search for computers within the AD for AD sync. You can specify multiple DNs with multiple options. Required if this is the first Connector in the deployment. See the table above on the differences between the Connectors for more information. Newly provided base DN(s) will automatically replace previous base DN(s). A string array parameter. |
| usersfilters | --users-filter |
The filter to search for users within Active Directory. Specify multiple filters with multiple options. Default user filter: (&(objectCategory=person)(objectClass=user)). A string parameter. |
| interval | --sync-interval |
The interval (in minutes) for how often to sync AD users and computers with the CASM Service. A uint8 parameter. |
| deployment/domain | ||
| caCertPath | --ldaps-ca-cert |
Required, to supply a CA certificate for the connection to AD over LDAPS. A string parameter. |
| poolgroups | --pool-group |
Specifies one or more Active Directory groups, by entering the distinguished name (DN), to be assigned to pools for remote workstation management (eg, --pool-group 'CN=GroupPool1,CN=Users,DC=sample,DC=com' --pool-group 'CN=GroupPool2,CN=Users,DC=sample,DC=com'). A string parameter. |
| N/A | --preferred-name |
This is an optional flag to determine if the hostname or machine name should be displayed to identify the remote workstations, the default is set to display machine name. |
*These configuration parameters are only applicable for the Connector on RHEL/Rocky Linux.
Troubleshooting the Connector
If you encounter issues when attempting to install the Connector, please see the Troubleshooting section for information on how to potentially diagnose the specific issue. You can also view the following KB article here which provides a list of troubleshooting steps for common issues related to installing the Connector. For information on installer errors related to a change in the distribution system, see Installer Issues.
Installing the Connector for Internal Connections
The following steps outline how to install the Connector for internal connections to bypass MFA:
- Prepare a virtual machine in your private network that meets the system requirements with the following sub-steps:
- Skip the step for preparing the system for external access.
- Skip the step for setting up MFA.
- Install the Connector with the following sub-steps:
- Do not set the Public IP using the
--external-pcoip-ipflag. The Connector will instead return the virtual machines IP address. - No MFA flag is required as MFA is disabled by default.
- Do not set the Public IP using the
- Once you have installed the Connector connect to a remote workstation with a PCoIP Software Client with the following sub-step:
- In the Host Address or Code field enter the private IP of the internal Connector you just installed and log-in.
If you want to use the same url for an external Connector as an internal Connector, for example connector.domain.com, you must set-up an internal/private DNS. In this DNS create an entry called connector.domain.com and map it to the private IP of the internal Connector. User's will then be able to connect to this entry by entering connector.domain.com in the Host Address or Code field in the PCoIP Client. The internal connection will connect to the internal Connector, and the external connection will connect to the external Connector.
Connecting to a Remote Workstation with a PCoIP Client
After successfully installing a Connector, you can initiate a session to connect to a remote workstation with a PCoIP Software Client. Teradici enables customers to use multi-factor authentication for these PCoIP Client sessions. The following steps outline how to connect to a remote workstation using the PCoIP Software Client:
- Double-click the PCoIP Client desktop icon or program file PCoIPClient to launch the application.
- In the Host Address or Code field, enter one of the following:
- For direct connections, provide the address of the host machine.
- For managed connections, provide the address of the connection manager.
- Click NEXT.
- Select your domain and enter the credentials for the remote workstation. If you have enabled MFA then you will be prompted for the 2nd factor passcode. The method of how this passcode is communicated depends on the provider you used. It is usually either a One Time Password or push notification.
- Click LOGIN.
- If your login is successful you should be able to select the remote workstation and connect to it. Please note that if you have a single remote workstation, that remote workstation is automatically selected and the connection is initiated immeadiately. In this case you will not be presented with a remote workstation selection screen.
For more information about the PCoIP Software Client, please see the following PCoIP Software Client guides: