AMT Power Management in Anyware Manager
Anyware Manager can use Intel® AMT to remotely power operate physical workstations. To be controlled remotely, a physical workstation within a deployment must have Intel AMT provisioned.
Provisioning Intel® AMT for Workstations
To use Intel® AMT, physical access to the workstation is required in order to perform manual provisioning and each workstation needs to be provisioned for Intel® AMT. Support for AMT power operations is not limited to workstations made by HP. Support for AMT version 12 is provided by default. AMT versions as low as AMT 9 are also supported with the selection of the Enable support for AMT 11 or lower toggle in the UI that allows communication via the less secure TLS 1.1 protocol.
Transport Layer Security(TLS) Configuration Required
Only TLS connections are supported by the Anyware Manager to communicate with Intel® AMT devices. Non TLS or Mutual TLS (mTLS) connections are not supported. As the network traffic is unencrypted before setting up TLS, HP recommends performing manual provisioning and configuration in a closed network.
Provisioning Intel® AMT
A brief overview of provisioning HP Workstations is available in the Setting up and configuring Intel® AMT in HP Business Notebooks, Desktops, and Workstations white paper provided by HP. For more detailed information about provisioning AMT, please refer to the documentation provided by Intel: Intel® Active Management Technology Implementation.
Perform the following steps to enable and provision Intel® AMT for interoperation with HP Anyware Manager:
- Power on the workstation.
- During POST press F6 or Ctrl+P to enter the MEBx setup menu (this depends on the model of the workstation).
- Select MEBx Login and enter the default password “admin”.
- Create a new password. For best practices regarding AMT passwords, refer to the Setting up and configuring Intel® AMT in HP Business Notebooks, Desktops, and Workstations white paper provided by HP.
- Select Intel® AMT Configuration.
- Select Power Control.
- In Host Sleep States section, ensure that the Intel® AMT ON option is set to On in S0, and ME Wake in S3 and S4-5.
- Press Esc key to go back to the previous menu.
- Select Activate Network Access.
- Press Y to activate network access.
- Exit the MEBx setup menu.
Intel® AMT provisioning setup is now completed. To verify the provisioning is correctly configured, open a web browser and go to http://<hostname>:16992 and sign-in in with the username “admin” and the password that was created above.
Enterprise Provisioning
Enterprise provisioning is not currently supported in the Anyware Manager.
Communication Security
TLS
Transport Layer Security(TLS) is required by the Anyware Manager to communicate with the Intel® AMT device in an encrypted form. The AMT device holds a server certificate that must be trusted by the Manager to establish a connection. To avoid name mismatch errors, the FQDN/IP used for the workstation by the Manager must match the Common Name or a Subject Alternative Name of the certificate.
Digest
The Manager uses a digest username and password to connect to an AMT device. The username and password must be saved in the Manager for each workstation to which the Manager connects via AMT. The passwords used for AMT are encrypted when stored by the Manager.
Password Tip
Consider using different passwords for each AMT device as this reduces the area of attack if a single password is compromised.
Configuring Transport Layer Security(TLS) for Anyware Manager
TLS can be configured using MeshCommander, an open source Intel® AMT management console. Click here to download and install MeshCommander. The steps to configure TLS using MeshCommander are as follows:
- Open MeshCommander.
- If you do not already have a Root Certificate configured, follow these steps:
- Open the Certificate Manager tab.
- Create a Root Certificate.
- View the new Root Certificate and save the
.pemfile. - Import the public key of the
.pemfile to the Provider Service Accounts page of the Anyware Manager.- The Manager service needs to trust this certificate.
- This single trusted Root certificate should be used to issue TLS certificates for each workstation going forward.
- Open MeshCommander and click the Computer Management tab.
- Add the provisioned workstation.
- Connect to the workstation.
- Open the Security Settings tab.
- Click Add Certificate and add the root certificate as a Trusted Root Certificate.
- Click Issue Certificate and use the root certificate to issue a TLS Server (HTTPS) certificate.
- Ensure that the common name matches the FQDN/IP you intend to use for connecting the workstation to the Anyware Manager.
- Click link next to Remote TLS Security.
- Select the newly issued certificate and Server-auth TLS only.
- Click OK.
- Reconnect with the workstation with TLS connection.
TLS connection is configured with the workstation. When TLS is enabled, you can access the web interface hrough https://<hostname>:16993.
Root certificate for TLS
When enabling TLS through MeshCommander, a Root Certificate and private key can be imported from the file system. This process needs to be done for each workstation individually.
Creating Intel® AMT Workstations in Anyware Manager
When Intel® AMT provisioning and TLS configuration is complete, workstations can then be added to the Anyware Manager administrative console. You need to edit an existing deployment in order to add workstations. If you do not have an existing deployment, you have to create one. For detailed steps, See Managing Deployment. To create Intel® AMT workstations, do the following:
-
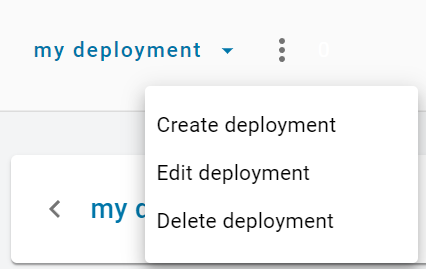
In Anyware Manager, click Edit deployment from the kebab option to edit your deployment to provide the trusted Root Certificate to the Intel® AMT Provider Service Account
 .
. -
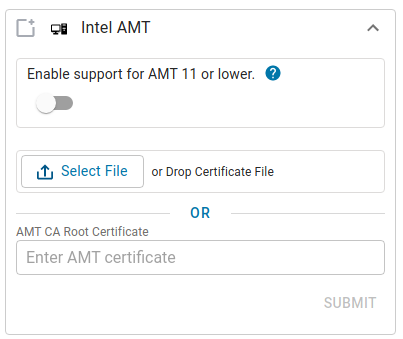
Under Provider Service Accounts open the Intel® AMT account box.
-
Click Select File, browse and upload a Root Certificate public key file in the
.pemformat from your system. You can also copy and paste contents from the Root Certificate public key file to the AMT CA Root Certificate section.
-
Click Submit.
-
If you do not have an existing Connector, you should create one. For detailed steps, Click here.
-
Add workstations for the Intel® AMT service provider. Make sure to use the same FQDN/IP For each workstation that matches the Common Name or Subject Alternative Name of the workstation's AMT server certificate. For detailed steps, see Adding a Remote Workstation.
Authorized Access
You can set up authorized access to the workstations for individual users or pools. Authorized access can be configured at any time.
-
Open the workstation added for Intel® AMT. Under the Provider Information section, enable the Managed by Anyware Manager toggle. If the credentials are not entered an error message This workstation cannot be managed by Intel AMT without administrator credentials is displayed.
-
If the AMT network interface is not the same as the LAN IP/FQDN, use the Alternate AMT IP/FQDN field to specify the AMT network interface reachable by the Manager.
-
Populate the digest username and digest password for the workstation in the Intel® AMT Username and Intel AMT Password fields and click Save Credentials. It validates with AMT that the digest credentials are correct, even if the Managed by Anyware Manager toggle is off.
Workstation configuration for Intel® AMT is complete.
Intel® AMT Power Operations
Once the workstations are added and the Intel® AMT configuration is completed, you can manage power operations for each workstation in the Workstations or Workstations Pools page:
- Open a desired workstation.
-
The current available power operations are shown in the drop-down menu. To change the power state, select the desired operation from the drop-down menu and click Run Operation.

- Available remote power operations are:
- Power On
- Power Off
- Graceful Shutdown
- Reset
- Graceful Restart
Graceful Power Options
Intel® Management and Security Application Local Management is required to support graceful power operations. Graceful Shutdown requires Intel® AMT version 9 or greater and Graceful Restart requires Intel AMT version 10 or greater.
- Available remote power operations are:
You can also execute power operations on a single workstation or on multiple workstations from the Workstations or Workstations Pools page:
-
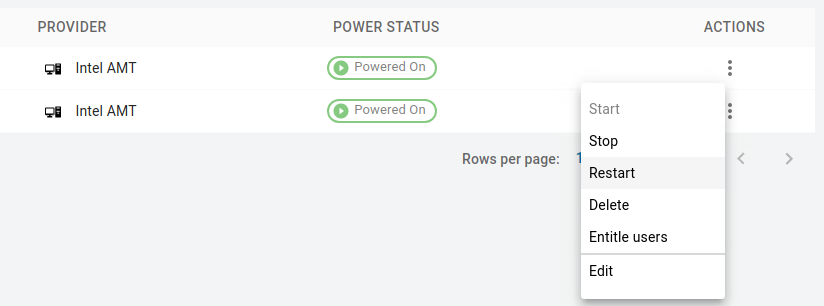
Under the ACTIONS section, click the kebab option to select the desired power operation.

- Available remote power operations are:
- Start (Power On)
- Stop (Power Off)
- Restart (Reset)
- Available remote power operations are:
To execute power operations on multiple workstations, select the desired workstations using the checkbox column on the leftmost side of the table and then select the kebab option on the top right next to the COLUMNS button and choose the desired power option.

For a Pool of workstations follow the same steps as above from the Workstations Pools page.
Power Operation Cooling time
Once a power operation is triggered, the Manager does not permit another power operation to be sent for 20 seconds in order to protect the AMT device.
Intel® AMT Troubleshooting Errors
When interacting with an Intel® AMT workstation in Anyware Manager, some errors can occur. Reference the following table for more information on these errors.
| Error Message | Interpretation |
|---|---|
| Network timeout occurred | A network timeout occurred when trying to reach the workstation on the provided FQDN/IP. The workstation could not be reached. |
| FQDN/IP does not match AMT certificate subject | The certificate representing the individual AMT workstation did not have a Common Name or Subject Alternative Name matching the FQDN/IP provided in the Manager to connect to the workstation. These fields must match in order for the Manager to have confirmation it is interacting with the intended workstation. |
| AMT root certificate does not match Intel provider CA certificate | The root certificate which signed the individual AMT workstation certificate does not match the root certificate which was entered into the Intel Provider Service Account page. The root certificate present in the chain of the workstation certificate is not trusted. |
| Error validating management credentials: |
There was an error while trying to verify digest credentials for the workstation with AMT. See error text for details. |
| No credentials found. | No digest credentials have been saved for the workstation, so the Manager cannot interact with AMT. |