Installing the Graphics Agent for macOS
Always have a secondary means of access to your remote machine
Currently, the Graphics Agent for macOS can be impacted by operating system-level events which may cause PCoIP connections to stop working. To recover from these situations, you must be able to access the remote machine directly, either physically or via VNC. See Troubleshooting for help.
Before starting, be aware of the following conditions:
-
Firewall settings
The macOS machine that will act as the PCoIP host must allow PCoIP traffic through its firewall. Firewall settings should be either:
- The firewall is off, or
-
The firewall is on, and:
-
Automatically allow downloaded signed software to receive incoming connections is checked, or
-
Automatically allow downloaded signed software to receive incoming connections is not checked, and the following executables are allowed through the firewall:
- /Applications/PCoIP Agent.app
- /Applications/PCoIP Agent.app/Contents/MacOS/pcoip-agent
- /Applications/PCoIP Agent.app/Contents/MacOS/pcoip-server
If the firewall is on and Automatically allow downloaded signed software to receive incoming connections is not checked, you will be prompted to allow the above permissions during installation.
Finding Automatically allow downloaded signed software to receive incoming connections
The Automatically allow downloaded signed software to receive incoming connections setting is in System Preferences > Security & Privacy, under the Firewall tab. Click Firewall Options to reveal it. The Firewall Options button is only visible if the firewall is on.
-
-
Energy Saver settings
Energy Saver features can cause the remote system to go to sleep or become unresponsive. To prevent this, open System Preferences > Energy Saver, and configure the settings as follows:
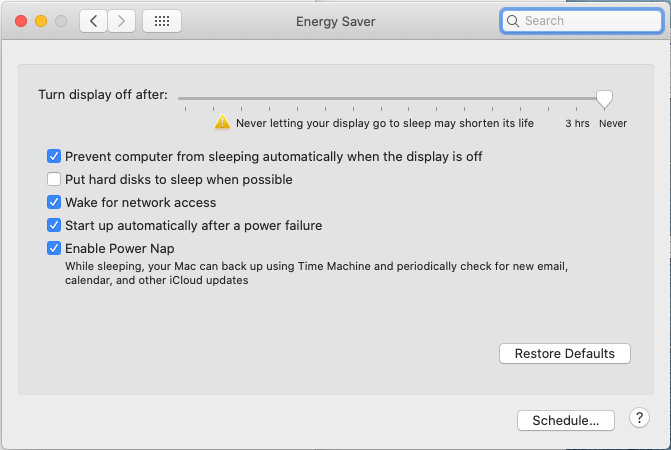
Setting Value Turn off display after set slider to Never Prevent computer from sleeping automatically when the display is off checked Put hard disks to sleep when possible unchecked Wake for network access checked Start up automatically after power failure checked Enable Power Nap checked -
Create a user account for PCoIP Connections. The user name cannot contain spaces, and cannot be the root user account (the root user is an administrative account with elevated permissions, and is disabled by default in macOS).
Installing With the Interface
-
Download the installer to the machine you'll be using as the PCoIP host.
-
Run the installer pkg.
-
Click through the installer steps and accept the End User License Agreement. The agent application will be installed.
-
Open the PCoIP Agent application, found in /System/Volumes/Data/Applications/PCoIP Agent.app.
-
You will be prompted to allow Accessibility permission. Grant and confirm privacy permissions for Accessibility.
-
Open the PCoIP Agent application again.
-
You will be prompted to allow Screen Recording permission. Grant and confirm privacy permissions for Screen Recording.
Note: No user interface
The PCoIP Agent application launches PCoIP services which continue to run in the background. There is no user interface and no further direct interaction with the application. You do not need to launch PCoIP Agent.app again after installation.
-
Next, provide the license registration code you received from Teradici.
Important: This step does not apply for PCoIP License Server users
If you are using a local PCoIP License Server, do not follow this step; refer to Licensing the Graphics Agent for macOS.
If you are using Teradici Cloud Licensing, open a terminal window and type one of the following commands, depending on whether your host machine is behind a proxy server:
-
If you use a proxy server to access the internet, provide this command (replace
<XXXXXX@YYY-YYYY-YYY>,<PROXY_SERVER_ADDRESS>, and<PROXY_PORT_NUMBER>with your own values):sudo pcoip-register-host --registration-code=<XXXXXX@YYY-YYYY-YYY> --proxy-server=<PROXY_SERVER_ADDRESS> --proxy-port=<PROXY_PORT_NUMBER>
-
If your system does not use a proxy server, provide this command (replace
{REGISTRATION_CODE}with your own value):sudo pcoip-register-host --registration-code=<XXXXXX@YYY-YYYY-YYY>
If you are using a PCoIP License Server, refer to Licensing the Graphics Agent for macOS for licensing instructions.
-
-
Restart the machine.
Installing With the Terminal
-
Download the installer to the machine you'll be using as the PCoIP host.
-
Open a terminal window.
-
Run the installer using the following command. Replace {PACKAGE_NAME} with the name of the .pkg file you downloaded:
sudo installer -pkg {PACKAGE_NAME}.pkg -target /
The installer will return a
0if successful. A return value of anything other than0indicates a failure. -
Open the PCoIP Agent application, found in /System/Volumes/Data/Applications/PCoIP Agent.app.
-
You will be prompted to allow Accessibility permission. Grant and confirm privacy permissions for Accessibility.
-
Open the PCoIP Agent application again.
-
You will be prompted to allow Screen Recording permission. Grant and confirm privacy permissions for Screen Recording.
Note: No user interface
The PCoIP Agent application launches PCoIP services which continue to run in the background. There is no user interface and no further direct interaction with the application. You do not need to launch PCoIP Agent.app again after installation.
-
Next, provide the license registration code you received from Teradici.
Important: This step does not apply for PCoIP License Server users
If you are using a local PCoIP License Server, do not follow this step; refer to Licensing the Graphics Agent for macOS.
If you are using Teradici Cloud Licensing, type one of the following commands, depending on whether your host machine is behind a proxy server:
-
If you use a proxy server to access the internet, provide this command (replace
<XXXXXX@YYY-YYYY-YYY>,<PROXY_SERVER_ADDRESS>, and<PROXY_PORT_NUMBER>with your own values):sudo pcoip-register-host --registration-code=<XXXXXX@YYY-YYYY-YYY> --proxy-server=<PROXY_SERVER_ADDRESS> --proxy-port=<PROXY_PORT_NUMBER>
-
If your system does not use a proxy server, provide this command (replace
<XXXXXX@YYY-YYYY-YYY>with your own registration code value):sudo pcoip-register-host --registration-code={REGISTRATION_CODE}
If you are using a PCoIP License Server, refer to Licensing the Graphics Agent for macOS for licensing instructions.
-
-
Restart the machine.