Installing, Updating, and Uninstalling PCoIP Virtual Channel Plug-Ins
In this section, you'll learn how to install the PCoIP Virtual Channel plug-in on a Windows endpoint, a Linux endpoint, a macOS endpoint, and an iOS or Android endpoint. You'll also learn how to update and uninstall PCoIP Virtual Channel plug-ins.
The topics include:
- Installing PCoIP Virtual Channel Plug-Ins
- Updating PCoIP Virtual Channel Plug-Ins
- Uninstalling PCoIP Virtual Channel Plug-Ins
Creating a custom application installer
For developers of custom plug-ins, Teradici recommends that you create an installer that will automatically install and uninstall the plug-ins.
Installing PCoIP Virtual Channel Plug-Ins
You can deploy custom PCoIP Virtual Channel plug-ins as identical (symmetric) or asymmetric plug-in .dll files. You can create one .dll file to handle both receiving and transmitting functions and deploy the same .dll file on both agent and client sides.
Use the general steps in this example to install any of the sample PCoIP Virtual Channel plug-ins, for example, plugin_vchan_sample_dgram.dll, plugin_vchan_sample_stream.dll, or plugin_vchan_sample_u_echo.dll. Substitute the appropriate name in the description.
Installing PCoIP Virtual Channel Plug-Ins on a Windows Endpoint
Use the following procedure to install any of the sample PCoIP Virtual Channel plug-ins on a Windows endpoint where the PCoIP Client or Agent is installed.
To enable agent side PCoIP Virtual Channel functionality on Windows:
-
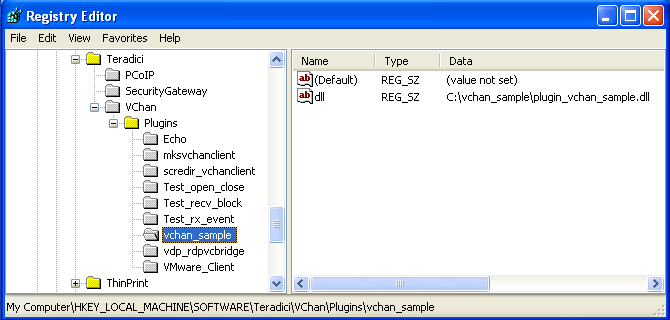
Use regedit to add a registry key for the plug-in and create vchan_sample key at:
- HKEY_LOCAL_MACHINE\SOFTWARE\Wow6432Node\Teradici\VChan\Plugins
-
Add a new string value called dll in the above key.
-
Set the associated data value of the dll string to the path and file name for the plug-in dll file, as shown next. In the following example, the data value of the dll string is set to C:\vchan_sample\plugin_vchan_sample.dll.
To enable client side PCoIP Virtual Channel functionality on Windows:
- Copy the .dll file that implements the client component functionality of the plug-in into the vchan plugins folder relative to the client executable. For example, C:\Program Files (x86)\Teradici\PCoIP Client\bin\vchan_plugins
Installing PCoIP Virtual Channel Plug-Ins on a Linux Endpoint
Use the following procedure to install any of the sample PCoIP Virtual Channel plug-ins on a Linux endpoint where the PCoIP Client or Agent is installed.
To enable agent side PCoIP Virtual Channel functionality on Linux:
- Copy the shared object (.so) files that implement the agent side of the plug-in into the /usr/lib/pcoip-agent/vchan_plugins folder.
Standard Utilities
Use the following standard utilities to extract information from the .so file:
- To list all the APIs exposed by the .so file, use nm *.so sudo
- To list all Teradici APIs, use nm *.so sudo | grep tera_
- To list all the other shared objects that the given shared object depends on, use dll *.so sudo
To enable client side PCoIP Virtual Channel functionality on Linux:
- Copy the shared object (.so) files that implement the client component functionality of the plug-in into the /usr/lib/x86_64-linux-gnu/pcoip-client/vchan_plugins folder.
Installing PCoIP Virtual Channel Plug-Ins on a macOS Endpoint
Use the following procedure to install any of the sample PCoIP Virtual Channel plug-ins on a Mac endpoint where the PCoIP Client is installed.
To enable client side PCoIP Virtual Channel functionality on macOS:
- Copy the .dylibs files that implement the client side of the plug-in into the vchan plugins folder relative to the client executable. For example, /Applications/PCoIPClient.app/Contents/MacOS/vchan_plugins.
Installing PCoIP Virtual Channel Plug-Ins on an iOS or Android Endpoint
You must integrate the iOS or Android plug-ins with a PCoIP client. If you want to build plug-ins for iOS or Android platforms, contact the Teradici Support Team by submitting a support ticket.
Updating PCoIP Virtual Channel Plug-Ins
You update Teradici plug-ins differently than custom plug-ins.
To update Teradici plug-ins, updating or reinstalling the agent and/or client software automatically installs the Teradici plug-ins. For custom plug-ins, you need to first uninstall the agent and/or client software, and then reinstall the custom plug-ins.
To update a Teradici plug-in:
- Update or re-install the agent and/or client software. Updating or reinstalling the agent and/or client software automatically updates the Teradici plug-in.
To update a custom plug-in:
- Update or reinstall the agent and/or client software.
- Reinstall the custom plug-in.
Uninstalling PCoIP Virtual Channel Plug-Ins
You uninstall Teradici plug-ins differently than custom plug-ins.
For Teradici plug-ins, uninstalling the agent and/or client software automatically uninstalls the Teradici plug-ins and their associated registry keys. For custom plug-ins, you need to first uninstall the agent and/or client software, and then use your custom uninstaller to uninstall the plug-in (or manually delete the custom plug-in).
Creating a custom application installer
For developers of custom plug-ins, Teradici recommends that you create an installer that will automatically install and uninstall the plug-ins.
To uninstall Teradici plug-ins:
- Uninstall the agent and/or client software. Uninstalling the agent or client software automatically uninstalls the Teradici plug-ins and their associated registry keys.
To uninstall custom plug-ins:
- Uninstall the agent and/or client software.
- Uninstall the plug-ins by doing one of the following:
- If you have a custom uninstaller for the plug-ins, run the application uninstaller to uninstall the plug-ins.
- If you don't have a custom uninstaller, manually delete the custom plug-ins from the vchan_plugins folder.