Managing Endpoints > Organizing Endpoints into Groups
Organizing Endpoints into Groups
The ENDPOINTS page lets you organize managed endpoints into a hierarchy of groups and sub-groups. Each group can then be associated with a profile so that its endpoints can be updated with the same settings all at once.
When endpoints are first discovered, they appear in the UNGROUPED table if you have not created auto configuration rules to automatically group them as part of the discovery process. The example below shows a list of ungrouped endpoints.

Figure 5-3: ENDPOINTS Page – UNGROUPED
After creating groups and sub-groups, you can create auto configuration rules to automatically move endpoints into a group when they are first discovered. Alternatively, you can manually move endpoints into groups.
After an endpoint is moved to a group, either manually or automatically, it then appears in the GROUPED table on the ENDPOINTS page. If you have created an auto naming rule to name endpoints when they are first discovered or when they are moved between ungrouped and grouped categories, this rule is also applied at this time.
The example below shows a structure with endpoints in two different groups.
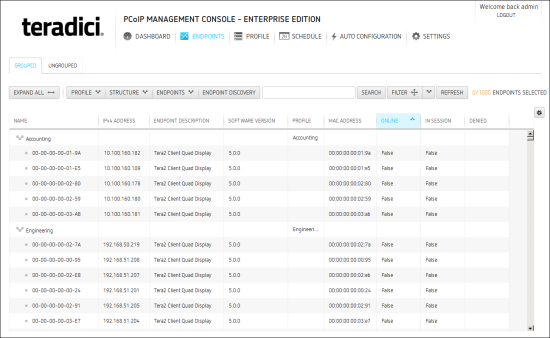
Figure 5-4: ENDPOINTS Page – GROUPED
Creating Groups Manually
- From the MC's top menu, click ENDPOINTS.
- Click STRUCTURE and then NEW GROUP.
- Select ^TOP to create a group at the top level or select the group under which you want to create a sub-group.
- Enter a unique name for the group (from within its group hierarchy) and click CREATE GROUP.
Moving Endpoints into Groups
You can move an endpoint either from its ENDPOINT DETAILS page or from the ENDPOINTS page, as shown below.
- From the ENDPOINTS page, click either the GROUPED or UNGROUPED tab.
- Select one or more endpoints in the table.
Note: Use Shift+click to select contiguous elements and Ctrl+click to select non-contiguous elements.
- Click STRUCTURE and then MOVE.
- Select the desired group or sub-group, and then click MOVE TO GROUP.
Note: if you have configured an endpoint naming convention that applies when you move endpoints to or from a group, the endpoints may also be renamed during this procedure.
Moving Groups
- From the ENDPOINTS page, click the GROUPED tab.
- Select a group in the table.
- Click STRUCTURE and then MOVE.
- Select the desired group or sub-group, and then click MOVE TO GROUP.
Note: if you have configured an endpoint naming convention that applies when you move endpoints to or from a group, the endpoints may also be renamed during this procedure.
Renaming a Group
- From the ENDPOINTS page, click the GROUPED tab.
- Select the group you want to rename.
- Click STRUCTURE and then RENAME.
- Enter a unique name (from within its group hierarchy) and click RENAME GROUP.
Removing a Group
Note: If you remove a group that contains sub-groups or endpoints, the sub-groups will also be removed and any endpoints will become ungrouped.
- From the ENDPOINTS page, click the GROUPED tab.
- Select the group you want to remove.
- Click STRUCTURE and then REMOVE GROUP.
- Enable the I understand message and click REMOVE GROUP.