 at the top of the page lets you globally enable or disable all schedules at once.
 The PCoIP Management Console lets you create schedules that are configured to run either once, at a certain date and time, or repeatedly, over a specified time frame and at a specified frequency. In this release, you can create schedules to apply a profile to one or more groups of endpoints, to power down one or more groups of endpoints, or to perform a power reset on one or more groups of endpoints.
All configured schedules are displayed on the PCoIP Management Console’s SCHEDULES page. You can view information about schedules that have previously run by clicking the HISTORY tab. Any configured schedules that have yet to run are also displayed on the PCoIP Management Console dashboard in its UPCOMING SCHEDULES area.
This page contains a table showing all the schedules that are currently configured for the PCoIP Management Console. You can create a new schedule from this page, or you can select a schedule from the table to view, edit, or delete. The All Schedules ON/OFF switch at the top of the page lets you globally enable or disable all schedules at once.
Click the gear icon ![]() to the right of the table to change the information you want to display in the table columns. Your customized settings are saved in your browser and will be used for any user who subsequently logs in from that browser.
to the right of the table to change the information you want to display in the table columns. Your customized settings are saved in your browser and will be used for any user who subsequently logs in from that browser.
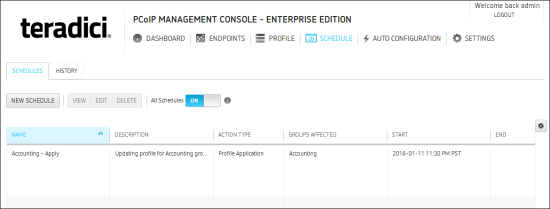
Figure 5-12: SCHEDULES Page
The HISTORY page provides a list of schedules that have previously run, along with pertinent information about each one. All scheduled and manual activities will appear in the schedule history (e.g., profile applications, power downs and resets).
Note: Events that are not scheduled, e.g., profile updates driven by auto-configuration, do not appear in the schedule history.
Click the gear icon ![]() to the right of the table to change the information you want to display in the table columns. Your customized settings are saved in your browser and will be used for any user who subsequently logs in from that browser.
to the right of the table to change the information you want to display in the table columns. Your customized settings are saved in your browser and will be used for any user who subsequently logs in from that browser.
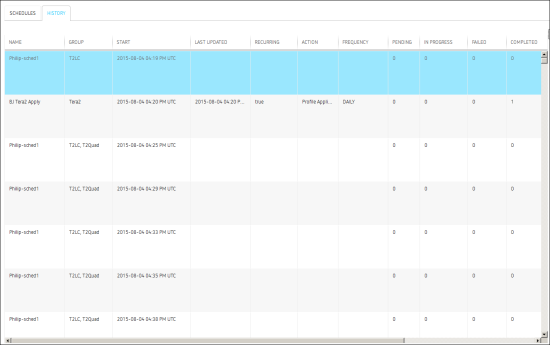
Figure 5-13: HISTORY Page
Note: Click the ? beside each field for help with any of the settings.
