Discovering Endpoints > Configuring DHCP Options Discovery
Configuring DHCP Options Discovery
When MC DHCP vendor class option discovery is used, endpoints receive a DHCP option value that contains information about the MC (i.e., the EBM/EM) to which they should connect. If an endpoint has already obtained a DHCP lease before the server is configured with MC DHCP options, it will be updated with this information when it renews the lease or acquires a new one. A zero client will renew its lease after a reboot or when it detects that the network has returned after going down (e.g., if someone reconnects the endpoint's network cable after unplugging one end of it).
Note: Endpoints also poll the DHCP server for option values at an interval equal to half the DHCP lease time.
You can configure your DHCP server with MC vendor class options to provide the following information:
- The MC's IP address or FQDN.
- The MC's certificate fingerprint (digital signature). This fingerprint is required if you have not installed the MC's trusted root CA certificate (the MC chain certificate) in the endpoint's certificate store and you want to use automatic discovery. If it is not provided and endpoints are not configured with an MC certificate that allows them to trust the MC, DHCP options discovery will not succeed. If provided, this fingerprint is only used when the endpoint's security level is set to Low Security Environment and certificate verification has failed. It is ignored when the security level is set to Medium Security Environment or High Security Environment.
Note: The endpoint only picks up the fingerprint in a DHCP option if the MC address is also specified in a DHCP option. For example, if the MC address is specified as a DNS SRV record but the fingerprint is provided as a DHCP option, the endpoint will not retrieve the fingerprint information in the DHCP server. You should configure MC information using either DHCP options or DNS records, but not both.
This discovery method requires you to have a DHCP server in your network that meets the following requirements:
- The DHCP server must support both DHCP option 60 (vendor class identifier) and option 43 (vendor-specific information). Option 60 is sent from the endpoint to the DHCP server. It contains a text string that uniquely identifies the device type. Option 43 is created by the administrator. For example, the instructions below show how to create a DHCP option 43 called PCoIP Endpoint along with two sub-options under it— EBM URI (sub-option 10) and EBM X.509 SHA-256 fingerprint (sub-option 11).
- The PCoIP endpoints must have DHCP enabled so they can send a request to the DHCP server and receive the address of the MC in response. This is their default setting.
Before You Begin
These instructions explain how to create a PCoIP Endpoint vendor class and two MC PCoIP Endpoint DHCP options.
Note: If you have used DHCP vendor class option discovery with a previous 1.x release of the MC and have already configured your DHCP server with the PCoIP Endpoint vendor class, you can skip the section entitled Adding the PCoIP Endpoint Vendor Class, below.
Before beginning, you should have the following information handy:
- The MC's IP address or FQDN. In the example below, this address is configured in a DHCP sub-option called EBM URI.
- The MC certificate SHA-256 fingerprint. In the example below, this hash value is configured in an optional DHCP sub-option called EBM X.509 SHA-256 fingerprint.
You can locate the MC's fingerprint as follows:
- Use Firefox to log in to the MC web interface.
- Click the padlock icon in the browser's address bar.
- Click More Information.
- Click View Certificate.
- In the Fingerprints section, copy and paste the SHA-256 fingerprint into a text editor.
Note: The examples in this section use Windows Server 2012 R2. The instructions may vary with other systems.
Adding the PCoIP Endpoint Vendor Class
To add the PCoIP DHCP vender class to your DHCP server:
- Log in to your Windows Server and select DHCP.
- Right-click on your DHCP server in the SERVERS pane and select DHCP Manager.
- Expand your server in the tree, right-click on IPv4, and then select Define Vendor Classes.

- Click Add to add a new DHCP Vendor Class.
- Enter PCoIP Endpoint in the Display name field.
- Enter PCoIP Endpoint in the ASCII column as the Vendor ID.

- Click OK to save and close the dialog.
Configuring DHCP Options
To add two MC DHCP options and apply them to a scope:
- Right-click on IPv4 in the tree and select Set Predefined Options.

- Select PCoIP Endpoint as the Option class and then click Add.
- In the Option Type dialog, enter the name EBM URI, data type String, code 10, and description Endpoint Bootstrap Manager URI, and then click OK.

- Click OK to save and close the dialog.
- For the MC's SHA-256 certificate fingerprint, repeat steps 1 and 2 again to add another option.
- In the Option Type dialog, enter the name EBM X.509 SHA-256 fingerprint, data type String, code 11, and description EBM X.509 SHA-256 fingerprint, and then click OK.

- Expand the tree for the DHCP scope to which you want to apply the options.
- Right-click Scope Options and then select Configure Options.
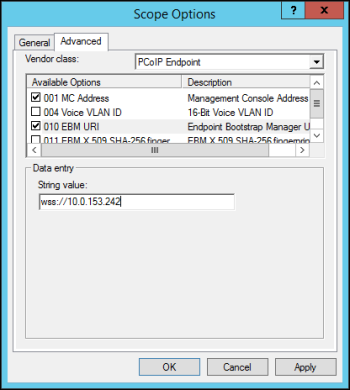
- Click the Advanced tab and then select the PCoIP Endpoint vendor class.
- Enable the check box for 010 EBM URI and then enter a valid Management Console URI in the Data entry field, and click Apply.
This URI requires a secured WebSocket prefix (e.g., wss://<MC IP address>:[port number]. The MC's listening port is 5172. Entering this port number is optional. If you do not include it, port 5172 will be used by default.
- Enable the check box for 011 EBM X.509 SHA-256 fingerprint and paste the MC certificate SHA-256 fingerprint you obtained above into the String value field.

- Click OK to save and close the dialog.