Changing the Default Network Configuration
The PCoIP Management Console virtual machine includes a network configuration tool called NetworkManager TUI (textual user interface) that lets you change the PCoIP Management Console’s default network configuration. You can use this tool to assign a static IP address to the PCoIP Management Console. Do NOT modify the DNS configuration with this tool.
Tip: Ensure you have correct DNS A and DNS PTR records set
Before you run the Network Configuration Tool, be sure to set the correct DNS A record and DNS PTR record in your DNS server for the PCoIP Management Console. If the records are already set, ensure you use the same IP address associated with the DNS records.
Note: Give PCoIP Management Console a fixed IP address
Teradici recommends that you give the PCoIP Management Console a fixed “static” IP address, either through a DHCP reservation or by Assigning a Static IP Address using the PCoIP Management Console’s network configuration tool. If a PCoIP Management Console is configured using DHCP and the IP address of the PCoIP Management Console changes, the endpoints it manages will be unable to connect to it.
Launching the PCoIP Management Console Network Configuration Tool
To launch the network configuration tool:
-
Log in to the PCoIP Management Console virtual machine console. For instructions, see Accessing the PCoIP Management Console Virtual Machine Console.
-
Type the following command at the command line to launch the network configuration tool:
sudo nmtui
Network Manager Configuration ToolInfo: Default configuration
The default configuration for IPv4 is DHCP based, identified by < Automatic >.
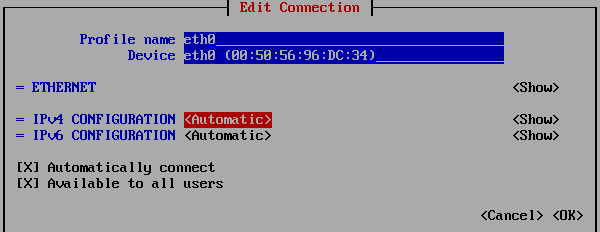
Tip: Configurable Interactive Elements
Angle brackets contain interactive elements that can provide further selections, and OK or Cancel changes. Use the keyboard Tab or arrow keys to move between interactive elements.
Select
to access additional configurable elements. 
Assigning a Static IP Address
To assign a static IP address using the PCoIP Management Console’s network configuration tool:
-
Launch the PCoIP Management Console’s network configuration tool.
-
Select Edit a connection.
-
Select eth0 then tab and select < Edit... >.
-
Tab to < Show > to access and configure your IPv4 parameters:
-
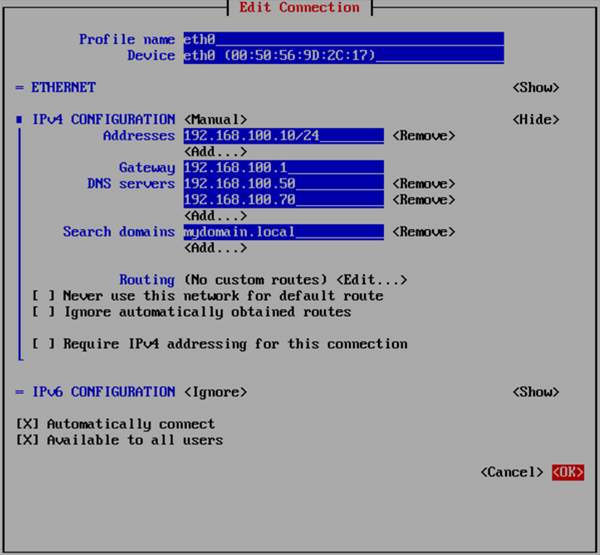
IPv4 CONFIGURATION: Set to Manual for a static IP configuration. Be sure to enter your network, see screen shot below.
-
Addresses: Enter the IP address you selected for your Management Console, ensuring you use the appropriate slash notation to define your subnet mask.
-
Gateway: Enter your default gateway IP address for the Management Console's network.
-
DNS servers: Enter the IP address of your DNS servers.
-
Search domains: Enter the domains used in your deployment in the format of mydomain.local.
-
Routing: Enter your networks routing requirements.
-
-
Tab to IPv6 CONFIGURATION and change automatic to Ignore.
-
Tab to < OK > and press Enter.
-
Tab to < Back > and press Enter to get to the main screen of the network configuration tool.
-
To have the settings take affect immediately, type the following command from the CentOS command line:
sudo systemctl restart network
Note: Shown next are example IP addresses
The IP addresses shown next are for example purposes only. Enter your own information.
Important: Correctly identifying subnets
Addresses and subnets must be correctly defined otherwise the PCoIP Management Console will not operate. Subnets are defined through the slash notation used in the Addresses field. The example of /24 represents 255.255.255.0. Your network may use different subnet sizes.