Using the Remote Workstation Card Software User Interface
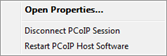
After you install the PCoIP Host Sofware package, the user interface (UI) is available in the Windows system tray. To access the UI, double-click the icon located in the Windows system tray, as shown next.
![]()
The UI provides multiple tabs that enables you to access different features.
The UI supports an additional feature that lets you disconnect the PCoIP session, if one is active. To initiate this feature:
-
Right-click the UI icon in the Windows system tray and select Disconnect PCoIP Session.
The PCoIP UI is automatically started during Windows startup. The UI is the only configurable software in the software package.
Remote Workstation Card Software Features Tab
The following figure shows the Features tab of the UI.
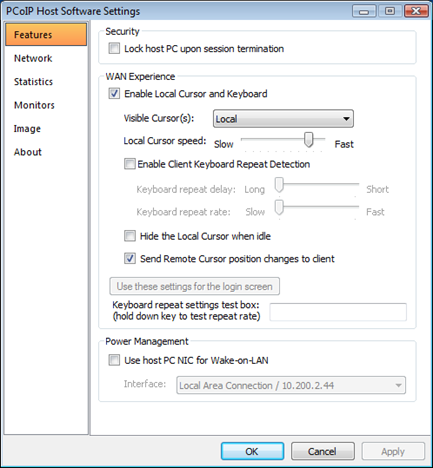
Security
The Security feature lets you lock the PC or workstation to ensure other users do not log into another user’s session when the user disconnects from a PCoIP session.
- Lock host PC upon session termination: Select this option to lock the Host PC when a PCoIP session is disconnected.
WAN Experience
The WAN Experience local cursor and keyboard features may be useful in WAN deployments where network latency exceeds 40-60 ms. In these environments, users may notice a visible lag between the movement of the mouse and the movement of the cursor. Key presses may be dropped or falsely repeated key presses may occur under very high network latency scenarios. Both of these side effects of high-network latency hinder user experience. The local cursor and keyboard features help lessen latency effects.
Latency effects are noticed differently by users. With network latency less than 40 ms, most users notice the local cursor overlay and desktop cursor moving in tandem. With higher network latencies, the local cursor overlay moves according to the user’s movements, and the desktop cursor follows with visible lag. Because the overlay provides instantaneous feedback, the user can move the mouse freely without having to wait for the desktop cursor to catch up.
WAN Experience
The Remote Workstation Card Software stores separate copies of the WAN Experience configuration settings for each client a user connects to a host from. This lets users enable the feature on certain clients and disable it on other clients. This is useful when a user connects to a host from a client at work over a LAN connection and another client at home over a WAN connection. In this scenario the user might disable the Local Cursor and Keyboard feature for the work client and enable the feature for the home client.
Settings for each user account
You can configure the Remote Workstation Card Software configuration settings for each user account on the PC or workstation.
-
Enable Local Cursor and Keyboard: The local cursor is enabled when this option is selected and the mouse device’s movements are recorded at the client. The movement is reflected via the local cursor overlay in real time. The movements and mouse clicks are sent to the PCoIP host and then to a driver via the exposed PCoIP Host Function PCI device and device drivers. When the driver receives the movement information, the cursor on the workstation is updated.
The local keyboard feature works on a similar concept. The client captures and records keyboard key presses, and then sends them to the PCoIP host. This feature prevents key presses from being dropped. The local keyboard feature does not display an overlay for the typed text, and the text that appears on the screen is affected by the network latency.
Considerations
-
The Enable Local Cursor and Keyboard option may be grayed out if not supported. When this happens, a “Why is this unavailable?” link appears on the UI Features tab. Move the mouse over the link to see a tooltip explaining how to fix the problem.
-
Remote Workstation Card Software release 3.2.20 and firmware release 3.2.0 add support for rotated displays. Users who want to use the Enable Local Cursor and Keyboard feature on systems with rotated displays may encounter problems. See for details.
-
When a soft client session is active, you cannot disable the Enable Local Cursor and Keyboard feature. See Soft Client Restrictions for details.
-
-
Visible Cursor(s): The available options are:
-
Remote: cursor shape drawn by the workstation/host. When the Remote visible cursor is selected, you cannot select Hide the Local Cursor when idle.
The Remote visible cursor option should only be used with PCoIP systems running firmware release 3.2.0 or later. The local cursor may become visible if the PCoIP host and client are running a firmware release prior to 3.2.0. -
Local: cursor shape drawn by the client. When the Local visible cursor option is selected, the remote cursor is hidden. Applications that override the Windows standard cursor (such as Windows Paint) may display both the local and remote cursors. See Resolving Issues and Workarounds.
When the local cursor is visible, the Remote Workstation Card Software imposes limits on the size of the cursor bitmap displayed by the client. When the size of the cursor bitmap exceeds these limits, the Remote Workstation Card Software crops the bitmap resulting in the client displaying a portion of the host drawn cursor. If the Remote Workstation Card Software fails to crop the bitmap, an arrow with an “L” character inside it is displayed.
When the Local visible cursor option is selected, the remote cursor is hidden.
The local cursor overlay icon appears as an arrow with an “L” in it when the local cursor is visible and the Remote Workstation Card Software cannot display the correct host drawn cursor.
For details including information on problems that may occur when hiding the remote cursor, see section Resolving Issues and Workarounds.
-
Local and Remote.
-
-
Local Cursor speed: Sets the speed of the local cursor overlay. The local cursor speed setting is separate from the mouse speed in Windows Linux.
Cursor speed slider
-
You can also configure the zero client cursor speed using the PCoIP On Screen Display (OSD). See the Tera2 PCoIP Zero Client Firmware 4.x and Remote Workstation Card Firmware 4.9 Administrators' Guide.
-
The cursor speed slider only works with zero clients. You cannot adjust the soft client cursor speed.
-
-
Enable Client Keyboard Repeat Detection: Select this option for the client to perform keyboard repeat detection. Uncheck this box for the host OS to perform keyboard repeat detection.
Enable this feature if the latency of the connection exceeds ~150 ms. When this feature is disabled, the host OS performs keyboard repeat detection. The host OS may incorrectly report repeated keys for high-latency connections.
This feature is supported on PCoIP systems running firmware release 3.2.0 or later.
-
Keyboard repeat delay: Set the length of time that elapses before a character begins to repeat when you hold down a key. This setting is only used when the client performs keyboard repeat detection.
-
Keyboard repeat rate: Set the speed at which a character repeats when you hold down a key. This setting is only used when the client performs keyboard repeat detection.
You can also configure the Zero Client Keyboard repeat delay and Keyboard repeat rate using the OSD. See the Tera2 PCoIP Zero Client Firmware 4.x and Remote Workstation Card Firmware 4.9 Administrators' Guide
-
-
Hide the Local Cursor when idle: Select this option to set the local cursor overlay to disappear after one second of idle mouse movement. Uncheck this box to always display the local cursor overlay.
-
Send Remote Cursor position changes to client: Check this box to enable forwarding host PC or workstation cursor location updates to the client. Client HID devices only control the client cursor when this feature is disabled.
Some applications update the cursor position while the user enters data. This feature should be enabled to let these updates be reflected on the client.
-
Use these settings for the login screen: Click this button to use the current settings on the screen for the Windows login screen.
Considerations
-
On Windows XP 32-bit, the Windows standard arrow cursor may not be hidden at the login screen even if the option is set. This is seen on PCoIP sessions with network latency of 125 ms or more.
-
The Remote Workstation Card Software installer included with releases 3.1.11 through 4.0.9 configures default settings for the local cursor login settings and the settings are overwritten each time the Remote Workstation Card Software is installed. The installer configures the settings to enable the local cursor, sets the visible cursor to Local, disables hiding the local cursor when idle and enables sending remote cursor position changes to the client. You can modify these settings using the UI after you install the Remote Workstation Card Software but they are overwritten if the Remote Workstation Card Software is reinstalled or upgraded/downgraded. You cannot disable the local cursor on the login screen. This is done to prevent problems when establishing a PCoIP session from a soft client, which requires the local cursor feature to always be enabled. As of release 4.0.10, the Remote Workstation Card Software installer no longer overwrites the login settings if they already exist. This enables users to customize the login settings once.
-
-
Keyboard repeat settings test box: Position the cursor in this test box and hold down a key to test the keyboard repeat settings.
Power Management
Power Management enables you to choose the PC or workstation NIC as an alternative to the PCoIP Host NIC for Wake-on-LAN (WOL) power management.
-
Use host PC NIC for Wake-on-LAN: Select this option to use a NIC on the PC or workstation, instead of the NIC on the PCoIP Host, for waking up the Host PC. The UI lists all PC or workstation NICs that have a valid IP address.
-
Interface: Select the NIC on the PC or workstation to use from the dropdown list.
WoL
-
Make sure the WOL feature is configured properly on the selected PC or workstation NIC when using this option.
-
The WOL settings are discarded when uninstalling or upgrading the Remote Workstation Card Software. You must reconfigure WOL after you install a new version of the software.
-
If there is an update to the PC or workstation NIC IP address, the UI picks up the new IP and automatically sends it to the zero client. Your software will also autonomously resolve the following changes:
-
The IP address on the selected NIC changes: The IP address is sent to the zero client.
-
The selected NIC is no longer available: The UI starts a timer for 20 seconds. If the selected interface becomes valid again, i.e., gets an IP address, the UI sends the new IP address to the zero client. If the timer times out, a balloon tooltip appears to advise users that the WOL configuration is invalid. UI automatically disables WOL.
-
UI detects no valid NICs: UI automatically disables the WOL feature on the zero client. This case is mutually exclusive with the second case.
Horizon Brokered Connections
The Remote Workstation Card Software for Windows for View brokered connections does not support the Power Management feature because the PCoIP host device cannot be placed in a low power state.
PCoIP power management lets a PC or workstation that is in a sleep or shutdown state be wakened or powered up by a WOL magic packet.
Remote Workstation Card Software Network Tab
The Network tab (shown next) displays the network settings of the PCoIP host.
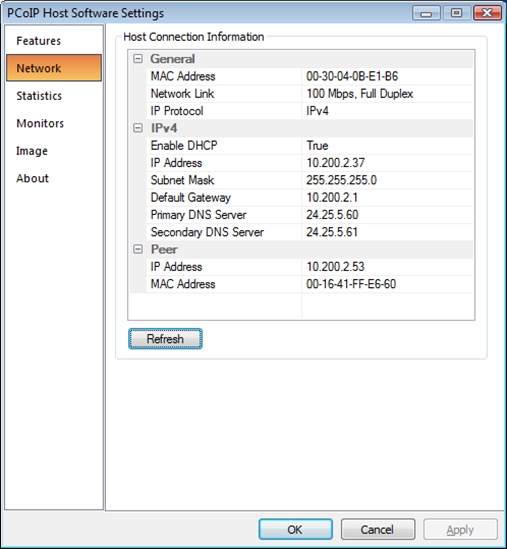
The Network tab shows the current network information for the host. This tab also reports status information on the NIC of the PCoIP host (speed, duplex setting, and link state – up/down). It also displays the IP and MAC addresses of the client connected to the host under the Peer settings.
-
Refresh: Click this button to get the most up-to-date network settings of the host.
UI for changing network settings unsupported
The UI does not support changing the network settings. You can configure the network settings through the PCoIP Management Console (see the PCoIP Management Console 1.x User Manual), the PCoIP Administrative Web Interface (see Tera2 PCoIP Zero Client Firmware 4.x and Remote Workstation Card Firmware 4.9 Administrators' Guide), or a connection broker.
Remote Workstation Card Software Statistics Tab
The Statistics tab (shown next) shows the measured rates for data packet traffic, round-trip latency, bandwidth, and imaging, as discussed next.
You can also access the PCoIP host card statistics through the PCoIP Administrative Web Interface (see Tera2 PCoIP® Zero Client Firmware Administrators' Guide or Remote Workstation Card Firmware Administrators' Guide).
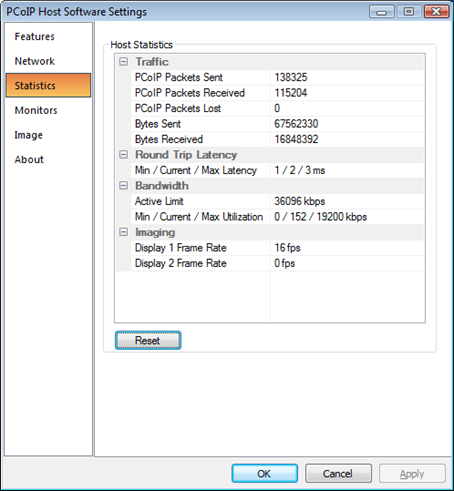
Traffic
The Traffic statistics show the number of packets sent and received by the PCoIP host.
-
PCoIP Packets Sent: Total number of PCoIP packets sent by the host.
-
PCoIP Packets Received: Total number of PCoIP packets received by the host.
-
PCoIP Packets Lost: Total number of PCoIP packets that were not received by the host.
-
Bytes Sent: Total number of bytes sent by the host.
-
Bytes Received: Total number of bytes received by the host.
Round Trip Latency
The Round Trip Latency statistics report the total roundtrip PCoIP system (for example, host to client and back to host) and network latency in milliseconds (± 1 ms). The UI reports the minimum, current, and maximum values.
Bandwidth
The Bandwidth statistics show the host’s active bandwidth settings.
-
Active Limit: The maximum amount of network traffic the PCoIP host may currently generate. The value is derived from the host’s configured bandwidth settings (see the (Undefined variable: Guides.Guide_ZC_Host_Admin)) and the current network congestion levels.
-
Min / Current / Max Utilization: The minimum, current, and maximum amount of traffic generated by the PCoIP host at a particular moment in time.
Imaging
The Imaging statistics show frame-rate information for the displays connected to the client.
- Display X Frame Rate: The frame rate of Display X. The statistic is reported in frames per second (fps).
Remote Workstation Card Software Monitors Tab
The Monitors tab, shown next, shows the client and host display topology settings.
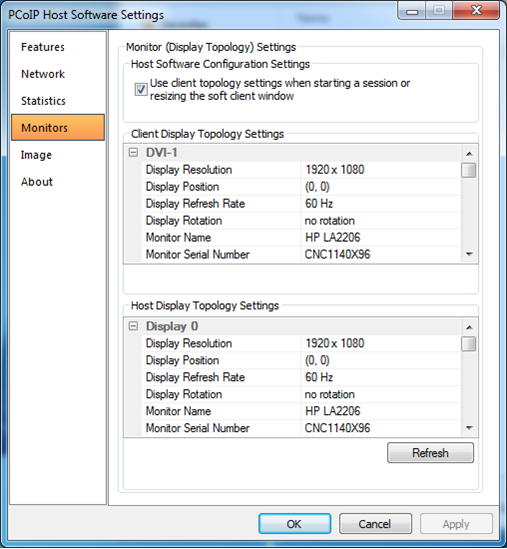
You can configure the following options and/or view the following settings:
Remote Workstation Card Software Configuration Settings
The Remote Workstation Card Software Configuration Settings section lets you choose to activate the client display topology settings. When this feature is enabled, the host topology settings are updated at the start of a session for both soft and zero clients. The topology settings are also updated when the size of the soft client window is adjusted.
-
Use client topology settings when starting a session or resizing the soft client window: The client display topology settings are activated at the start of a session and when the soft client window is resized under the following conditions:
-
This box is checked.
-
The Enable Configuration option on the zero client OSD Options > User Settings > Display Topology page is checked (only applies to zero clients).
-
The PCoIP host and zero client are running firmware release 3.2.0 or later.
-
The VMware View soft client version is release 4.6 or later.
-
Considerations
- This feature only works with clients in PCoIP sessions. The client topology settings are not written to the host OS when in an RDP session.
- If a problem occurs while trying to write the client display topology settings to the host OS, a 'Why are the client topology settings not in use?' link appears on the UI Monitors tab. Move the mouse over the link to see a tooltip explaining how to fix the problem.
- Sometimes the Remote Workstation Card Software fails to activate the client topology settings. When this happens try changing the topology settings using another utility on the host such as the Control Panel > All Control Panel Items > Display > Screen Resolution utility found on Windows 7.
Client Display Topology Settings
The Client Display Topology Settings section displays the client display topology settings.
-
Display Resolution: The number of pixels in each dimension that can appear.
-
Display Position: The X and Y coordinates of the display’s upper left-hand corner.
-
Display Refresh Rate: The display’s refresh rate in Hz.
-
Display Rotation: Specifies the rotation of the display relative to the normal landscape display orientation (no rotation, 90° clockwise, 180° rotation, or 90° counter-clockwise).
This parameter specifies the rotation of the physical display, not the image. -
Monitor Name, Serial Number, Vendor ID, and Product ID: The client extracts this information from the attached monitor’s EDID (Extended Display Identification Data).
Host Display Topology Settings
The Host Display Topology Settings section shows the active topology settings read by the UI from the host OS that match the displays connected to the client. This section does not show information about monitors that are not connected to the client.
-
Display Resolution, Display Position, Display Refresh Rate, and Display Rotation: See the description of these terms listed in the previous section.
-
Monitor Name, Serial Number, Vendor ID, and Product ID: The UI extracts this information from the EDID reported by the host operating system.
-
Refresh: Click this button to get the most up-to-date client and host display topology settings.
Remote Workstation Card Software Image Tab
The following figure shows the Image tab. This lets you view and adjust the PCoIP session image quality preference setting.
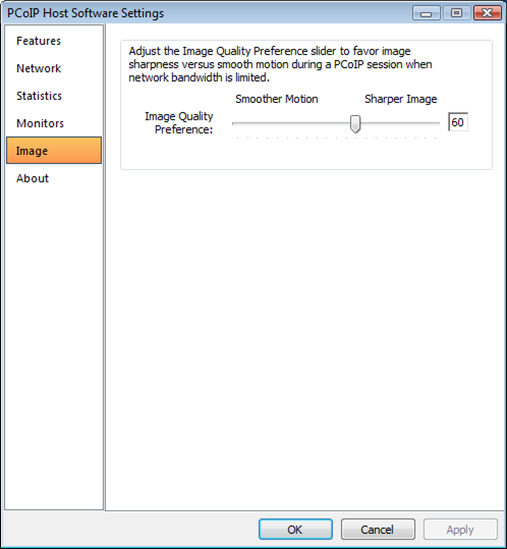
The PCoIP protocol adjusts image quality settings when the network connection between a PCoIP host and client is constrained and unable to provide enough bandwidth to support full frame rate video. The Image Quality Preference setting lets you configure a preference for smoother motion (higher frame rate) versus sharper image (higher image quality).
Tip
Firmware release 3.5.0 is the first release that supports Image Quality Preference.