Installing the Graphics Agent for Linux on RHEL or CentOS
Important: Required ports will be automatically opened
The Graphics Agent for Linux installer will add firewall exceptions for the following required PCoIP ports during installation: TCP 443, TCP 4172, UDP 4172, and TCP 60443.
To install the Graphics Agent for Linux software:
-
Download and install the Teradici pcoip-agent repository, via the shell script provided here.
Note: This installs the stable repository
This will install the stable repository for the Graphics Agent for Linux. The stable repo contains officially supported releases and is recommended for production systems.
-
Install the EPEL repository:
sudo yum install epel-release
-
Optionally install USB dependencies, if you intend to support USB devices other than keyboards, mice, and pointer devices. If you skip this step, USB redirection will be completely disabled and bridged USB devices will not work.
sudo yum install usb-vhci
-
Install the PCoIP Graphics Agent for Linux:
sudo yum install pcoip-agent-graphics
-
Note your machine's local IP address. Clients connecting directly to the host workstation will need this number to connect.
-
Enter the license registration code you received from Teradici.
Note: These instructions are for Cloud Licensing
These instructions assume you are using Teradici Cloud Licensing to activate your PCoIP session licenses. If you are using the Teradici License Server instead, see Licensing the Graphics Agent for Linux.
For unproxied internet connections, type:
pcoip-register-host --registration-code=<XXXXXX@YYY-YYYY-YYY>For proxied internet conections, type:
pcoip-register-host --registration-code=<XXXXXX@YYY-YYYY-YYY> --proxy-server=<serverURL> --proxy-port=<port>
-
Reboot the desktop.
Installing the Graphics Agent for Linux on a Physical PC
When installing the PCoIP Agent on a physical machine with a Quadro card, additional steps are required. If you installed the Graphics Agent for Linux on a virtual machine, you can ignore these steps.
Note: Install the agent first
You must install the Graphics Agent for Linux as described above before proceeding.
Important: Some GPUs are automatically configured
The Graphics Agent for Linux can use the following NVIDIA GPUs automatically:
- K2000
- K2200
- K4000
- K4200
- K5200
- M4000
- P2000
- P4000
- P5000
- P6000
- RTX4000
If you are unable to start a session using any of these GPUs, follow the procedure described next.
These steps are only required when installing on a physical, non-virtualized machine with a Quadro card:
-
Attempt to start a PCoIP session. If the connection attempt succeeds, you can stop here. Your GPU will work without further configuration. If the attempt fails, continue on; we will use the log information generated by the failed attempt in the next steps.
-
Look in /var/log/Xorg.100.log for lines like this:
[   293.834] (--) NVIDIA(GPU-0): LNX Linux XGA (DFP-0): connected
[   293.834] (--) NVIDIA(GPU-0): LNX Linux XGA (DFP-0): Internal DisplayPort
[   293.834] (--) NVIDIA(GPU-0): LNX Linux XGA (DFP-0): 1440.0 MHz maximum pixel clock
[   293.834] (--) NVIDIA(GPU-0):
[   293.834] (--) NVIDIA(GPU-0): LNX Linux XGA (DFP-1): connected
[   293.834] (--) NVIDIA(GPU-0): LNX Linux XGA (DFP-1): Internal TMDS
[   293.834] (--) NVIDIA(GPU-0): LNX Linux XGA (DFP-1): 165.0 MHz maximum pixel clock
[   293.834] (--) NVIDIA(GPU-0):
[   293.834] (--) NVIDIA(GPU-0): LNX Linux XGA (DFP-2): connected
[   293.834] (--) NVIDIA(GPU-0): LNX Linux XGA (DFP-2): Internal DisplayPort
[   293.834] (--) NVIDIA(GPU-0): LNX Linux XGA (DFP-2): 1440.0 MHz maximum pixel clock
[   293.835] (--) NVIDIA(GPU-0):
[   293.835] (--) NVIDIA(GPU-0): LNX Linux XGA (DFP-3): connected
[   293.835] (--) NVIDIA(GPU-0): LNX Linux XGA (DFP-3): Internal TMDS
[   293.835] (--) NVIDIA(GPU-0): LNX Linux XGA (DFP-3): 165.0 MHz maximum pixel clock
[   293.835] (--) NVIDIA(GPU-0):
[   293.835] (--) NVIDIA(GPU-0): DFP-4: disconnected
[   293.835] (--) NVIDIA(GPU-0): DFP-4: Internal DisplayPort
[   293.835] (--) NVIDIA(GPU-0): DFP-4: 1440.0 MHz maximum pixel clock
[   293.835] (--) NVIDIA(GPU-0):
[   293.835] (--) NVIDIA(GPU-0): DFP-5: disconnected
[   293.835] (--) NVIDIA(GPU-0): DFP-5: Internal TMDS
[   293.835] (--) NVIDIA(GPU-0): DFP-5: 165.0 MHz maximum pixel clock
[   293.835] (--) NVIDIA(GPU-0):
[   293.835] (--) NVIDIA(GPU-0): DFP-6: disconnected
[   293.835] (--) NVIDIA(GPU-0): DFP-6: Internal DisplayPort
[   293.835] (--) NVIDIA(GPU-0): DFP-6: 1440.0 MHz maximum pixel clock
[   293.835] (--) NVIDIA(GPU-0):
[   293.835] (--) NVIDIA(GPU-0): DFP-7: disconnected
[   293.835] (--) NVIDIA(GPU-0): DFP-7: Internal TMDS
[   293.835] (--) NVIDIA(GPU-0): DFP-7: 165.0 MHz maximum pixel clock
-
Note the names of the outputs with the highest maximum pixel clocks (as many as four will be shown). In the above example, you would note
DFP-0,DFP-2,DFP-4, andDFP-6.Note: Systems with fewer than four displays (Quadro K series)
If there are fewer than four outputs in your system, note them all. K-series cards only support two enabled outputs at a time, but may show more.
-
Create a file called /etc/X11/xorg.conf.d/10-pcoip.conf:
touch /etc/X11/xorg.conf.d/10-pcoip.conf
-
Open /etc/X11/xorg.conf.d/10-pcoip.conf in a text editor.
-
Paste the following text into the file:
Section "Screen"
Identifier "dummy_screen"
Device "dummy_videocard"
Option "UseDisplayDevice" ""
Option "ConnectedMonitor" ""
Option "Monitor-" "Monitor0"
Option "Monitor-" "Monitor1"
Option "Monitor-" "Monitor2"
Option "Monitor-" "Monitor3"
Monitor "Monitor0"
EndSection
-
Populate the
ConnectedMonitorandUseDisplayDevicesettings with the display IDs you noted earlier, as a comma-separated list. Using our example (your values may be different):Option "UseDisplayDevice" "DFP-0,DFP-2,DFP-4,DFP-6" Option "ConnectedMonitor" "DFP-0,DFP-2,DFP-4,DFP-6"
-
Next, map these output values to your expected displays. Modify the monitor options to correspond to the displays in the previous step. Each output should be mapped to a monitor identifier from one of the
Monitorsections in 10-pcoip.conf.Continuing our example, we would map the four outputs to four monitors like this (yours may be different; for example, you may only have two outputs):
Option "Monitor-DFP-0" "Monitor0"
Option "Monitor-DFP-2" "Monitor1"
Option "Monitor-DFP-4" "Monitor2"
Option "Monitor-DFP-6" "Monitor3"
-
Save and close 10-pcoip.conf.
-
Attempt another PCoIP session. If the session is still unsuccessful, and you have a Quadro K series card, repeat steps 7 and 8 with a different output combination, e.g. if you tried
DFP-3,DFP-4, tryDFP-1,DFP-2. Due to driver differences certain output combinations may not work. -
To prevent the NVIDIA driver from changing the kernel mode setting, add the
nomodesetparameter to the GRUB configuration:-
Open /etc/default/grub in a text editor.
-
Add
nomodesettoGRUB_CMDLINE_LINUX_DEFAULT. -
Save and close the file.
-
Rebuild the GRUB configuration:
sudo grub2-mkconfig -o /boot/grub2/grub.cfg
-
Reboot the machine.
-
-
Attempt a PCoIP connection again. The connection should succeed.
If the session does not start, make sure that the displays are correctly configured.
Once you've installed the software, you can configure it, register licenses, or connect to it.
Note: Desktop user interfaces will only be available using PCoIP
Once installed and running, the PCoIP Graphics Agent for Linux takes over the graphics subsystem which is then unavailable to hypervisors. You can only view the graphical user interface when connecting with a PCoIP client.
For example, you cannot view an ESXi virtual machine console through VSphere; you must connect to the machine using PCoIP.
Installing the Graphics Agent for Linux in a Dark Site
The Graphics Agent for Linux can be installed in an offline environment (with no connection to the public internet). To do this, you'll create a temporary internet-connected machine, download the agent RPM and its dependencies, then transfer the downloaded files to the permanent machine and install them.
To install the Graphics Agent for Linux in an offline environment:
Install GPU drivers before proceeding
The appropriate GPU driver must be downloaded, transferred, and installed before installing the Graphics Agent for Linux. The procedure for downloading GPU drivers varies by manufacturer and environment; a list of resources is located in Installing GPU Drivers on Linux Machines.
-
Create a temporary RHEL or CentOS machine with a connection to the internet and SSH into it.
-
On the temporary machine, install the Teradici repository:
-
Using a browser, go to Teradici's documents and downloads site, and look in the sidebar for documentation and download links.
-
Click the Downloads and scripts button.

Note: An account is required
If you are not logged in, you will see a log in prompt instead:

You can create an account when you click this button if you do not already have one.
-
Read and accept the Teradici End User License Agreement.
-
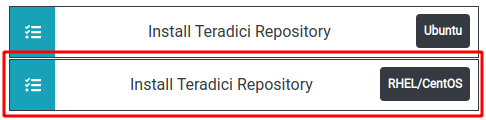
Click Install Teradici Repository (RHEL/CentOS) button
The container will expand to show a configuration script.
-
Copy the cURL script shown to your clipboard.
About the configuration script
This script automatically detects your operating system, and configures yum to download the appropriate packages. You can inspect the contents of the script by fetching the URL in the cURL command, without including
| sudo -E bash.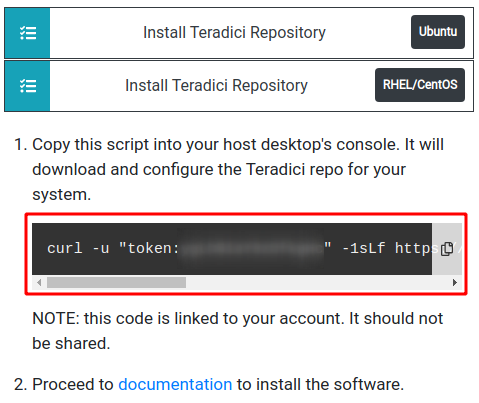
-
-
On the temporary machine, paste the cURL command you copied in the previous step and press Enter. The script will set up the Teradici repo on your system.
-
If you intend to support USB devices other than keyboards, mice, or pointers, install usb-vhci dependencies:
sudo wget https://dl.fedoraproject.org/pub/epel/epel-release-latest-7.noarch.rpm
sudo rpm -i epel-release-latest-7.noarch.rpm
-
Update your yum cache:
sudo yum -y makecache
-
Download the
createrepoutility.sudo yum install -y yum-plugin-downloadonly yum-utils createrepo
-
Create two new directories. The first, agent-installroot, will be used to collect installation files and then deleted later. The second, agent-rpms, will receive the actual repo files and will be transferred to the offline machine.
mkdir agent-installroot
mkdir agent-rpms
-
Download the repo files. In all the following examples, replace
<absolute_path_to>with the absolute path to your working directory:-
If you will support USB devices and you downloaded usb-vhci in step 3:
sudo yum install -y --downloadonly --installroot=<absolute_path_to>/agent-installroot --releasever=7 --downloaddir=<absolute_path_to>/agent-rpms pcoip-agent-graphics usb-vhci
-
If you will only allow keyboards, mice, and pointer devices to connect via USB, omit
usb-vhci. If you use this method, USB devices other than keyboards, mice, and pointer devices will not work:sudo yum install -y --downloadonly --installroot=<absolute_path_to>/agent-installroot --releasever=7 --downloaddir=<absolute_path_to>/agent-rpms pcoip-agent-graphics
-
-
Create a local repo in a new agent-rpms directory. This is the folder you will ultimately transfer to the offline machine.
sudo createrepo --database <absolute_path_to>/agent-rpms
-
Delete the installroot folder, which is no longer needed:
rm -rf <absolute_path_to>/agent-installroot
-
Transfer the agent-rpms directory and its contents to the offline machine using any acceptable method, such as a USB flash drive. Make a note of the absolute destination filepath on the offline machine; we'll need that next.
-
On the offline machine: Open /etc/yum.repos.d/offline-agent.repo in a text editor.
-
Paste in the following content, replacing
<absolute_path_to>with the absolute path to the agent-rpms directory:[offline-agent] name=CentOS-$releasever - agent-rpms baseurl=file:///<absolute_path_to>/agent-rpms enabled=0 gpgcheck=0
-
Install the packages:
Your GPU driver must already be installed on the offline machine
The GPU driver should already be installed before you proceed with this step. If you have not already installed it, refer to Installing GPU Drivers on Linux Machines for more information.
-
If you will support USB devices and you downloaded usb-vhci in step 3:
sudo yum --disablerepo=* --enablerepo=offline-agent install -y pcoip-agent-graphics usb-vhci
-
If you will only allow keyboards, mice, and pointer devices to connect via USB, omit
usb-vhci.sudo yum --disablerepo=* --enablerepo=offline-agent install -y pcoip-agent-graphics
-
-
Reboot the offline machine:
sudo reboot