Application and OS Optimization
Windows Performance Optimizations
We recommend the following Windows and application optimizations for the preceding sample profiles.
Windows Performance Options Optimization
For Virtual Desktop Infrastructure (VDI) use case in which high-server consolidation ratio's are advantageous, Microsoft offers a host of suggested Windows 10 optimizations: https://docs.microsoft.com/en-us/windows-server/remote/remote-desktop-services/rds-vdi-recommendations
Furthermore, third parties such as Login VSI, provide tools and guidelines for additional Windows 10 optimizations: https://www.loginvsi.com/blog/520-the-ultimate-windows-10-tuning-template-for-any-vdi-environment
Improving Performance on Windows Remote Desktops
We recommend making updates to the following settings to improve performance for Windows 10 desktops:
- Visual Effects
- Verify Processor Scheduling
- System Page File
The steps involved in configuring these settings are outlined in the section below. Please ensure you save any work, and close all programs before making these changes.
-
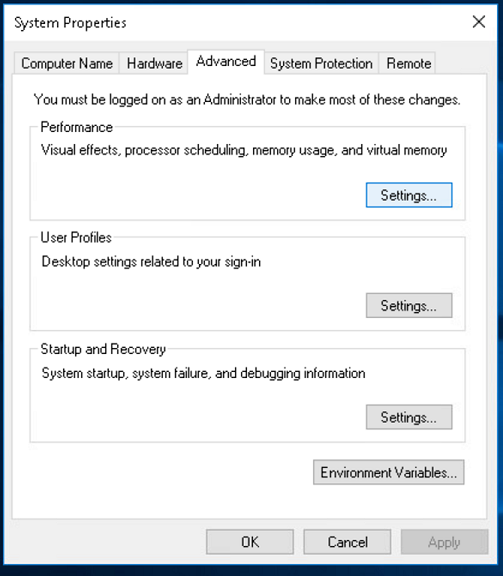
Navigate to View advance system settings within the Windows system Control panel.
-
From the Performance box within the Advanced tab, select Settings.
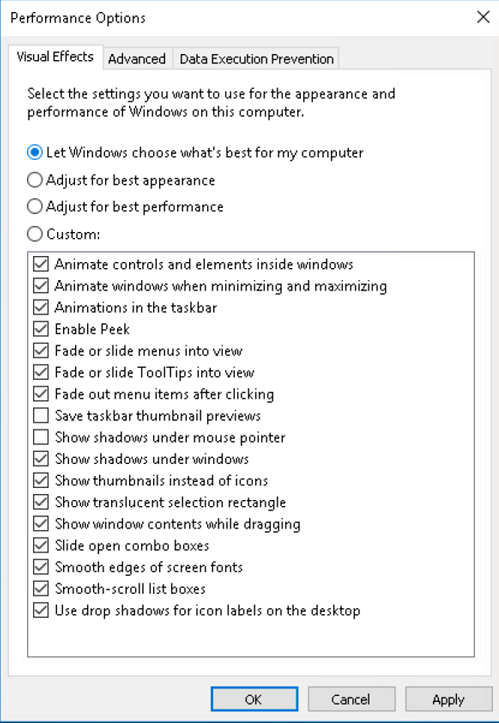
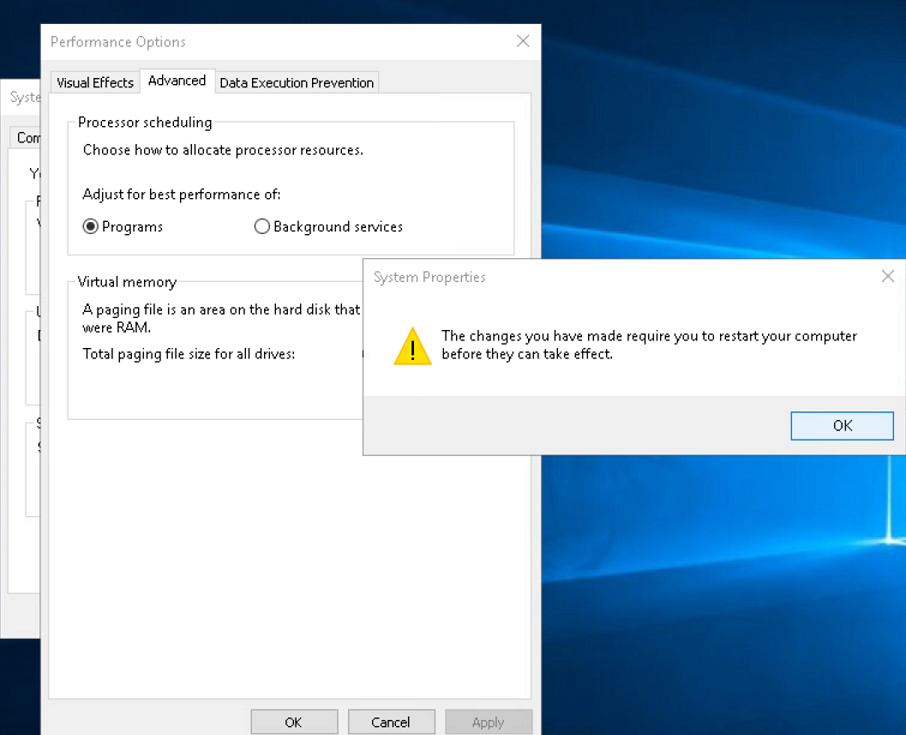
- From the Performance Options page select Adjust for best performance and click Apply.
-
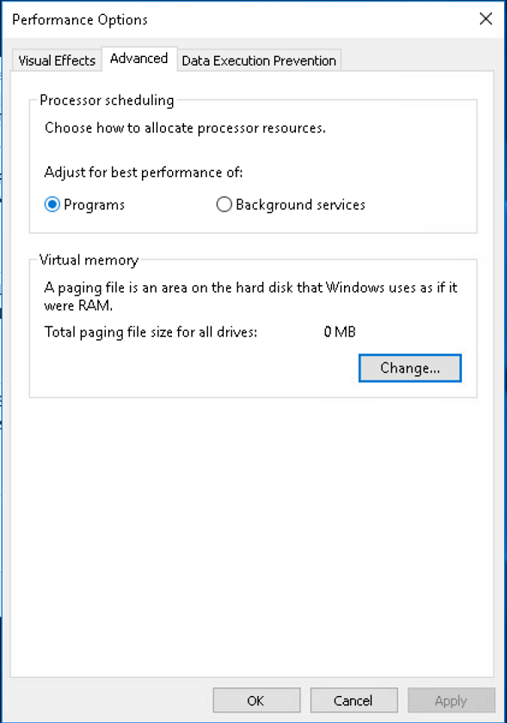
From the Performance Options page select the Advanced tab and click Programs is selected within the Processor scheduling box.
-
From the Virtual memory box select Change to display the Virtual Memory panel.
-
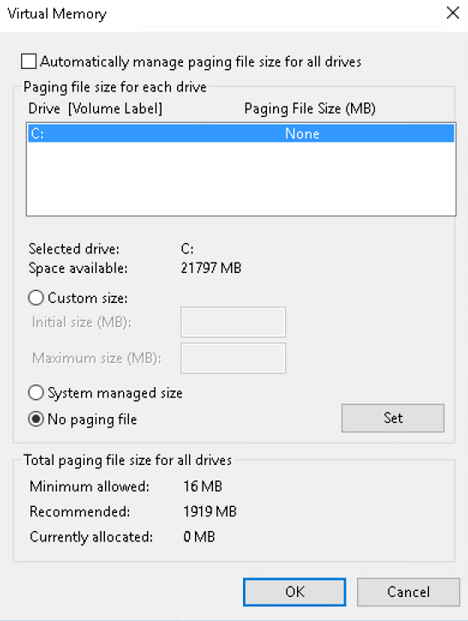
From the Virtual Memory panel, uncheck the option to Automatically manage paging file size for all drives.
-
Select No paging file from the Virtual Memory panel, as outlined in the image below.
-
From the Virtual Memory panel, click Set.
-
You will see a System Properties warning, click Yes.
-
From the Virtual Memory panel, click OK.
-
You will see another System Properties warning, click OK.
-
Return to the Performance Options page and to the Advanced tab and click Apply and then OK.
-
Restart your system for these changes to take effect.
Optimizations related to Windows 10 Visual Effects
The performance Options dialog is accessible from Control Panel>System and Security>System>Advanced System Settings. For profiles C, D and E, we recommend that you disable the ‘Show window contents while dragging’ policy. Additional performance optimizations are gained by adjusting Windows Visual Effects for best performance as described below.
Adobe Reader Optimization
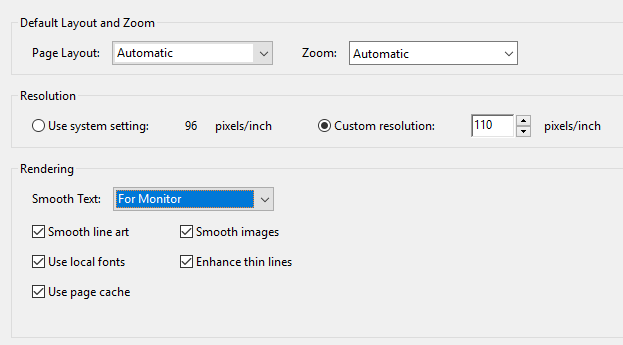
For Adobe Reader, go to Edit>Preferences>Page Display and set the Smooth Text setting to For Monitor, as shown below
Adobe Premiere Optimizations
If Adobe Premiere is experiencing unusual lag or problematic audio/video synchronization behavior, you can adjust Windows for best performance from Control Panel>System>Adjust the Appearance and Performance of Windows>Adjust for best performance.
Remote Access to 3D Rendering Software
The user interactivity of creative applications such as visual effects or architectural rendering software is contingent on reserved CPU availability to service peripheral devices and refreshing the GUI in a responsive manner. Applications with built-in or plug-in render capabilities are prone to poor user interactivity and low frame rates if the render engine consumes disproportionate CPU resources.
HP Anyware requires a small proportion of high priority CPU access to enable a responsive remote user experience. In many cases this may be ensured by adjusting render settings within the creative application software itself as many popular render engines provide CPU utilization controls via processor affinity, thread count or thread parameters.
In cases where remote user interactivity is adversely impacted by software applications using disproportionate CPU resources, performance may be remedied by one or more of the following actions:
Linux Environments
Linux systems spawn the pcoip-server process within scope of the system.slice while render processes are typically spawned in the user.slice (user session context), it is making it difficult to schedule relative priorities between pcoip-server and conflicting render processes.
- If available, adjust render engine settings to allow CPU resources for other tasks
- Use Linux cgroups to re-allocate shares in favor of system.slice, for example by allotting system.slice twice as many cpu.shares as the cpu.slice. It is highly recommended to test thoroughly in advance of deployment because share re-allocation may have unanticipated side effects such as enabling a system daemon to starve other user applications of CPU resources.
Read more on Linux cgroups: https://www.golinuxcloud.com/begineers-guide-cgroups-slice-examples-tutorial/
Windows Environments
- If available, adjust the render engine settings to allow CPU resources for other tasks.
- Manually set processor affinity for the application software, allowing at least one core for the pcoip agent (pcoip_server.exe). Note that this approach will not work if the application software spawns render tasks that override Windows processor affinity settings.
- Deploy third party real-time CPU optimization software.
Read more on Windows Processor Affinity: https://www.thewindowsclub.com/processor-affinity-windows
Enhanced A/V Sync
This feature reduces the delay between the audio and video channels. It is enabled in the PCoIP Client application. Enhanced A/V Sync offers improved lip sync while also reducing the number of dropped video frames during movie playback. When enabled, a small lag in user interaction and responsiveness is introduced and the maximum frate rate may be reduced. Enhanced A/V Sync is enabled on a per-display basis, so you can dedicate individual displays to playback without impacting responsiveness on the others. For further information on turning on and using the Enhanced A/V Sync on the PCoIP Software Clients, see the following guides:
Some video editing applications such as Adobe Premiere, provide user settings that adjust A/V synchronization. In the case of Adobe Premiere, audio latency can be adjusted in the audio hardware preferences page. For more information on this, consult the Adobe Premiere Pro User Guide.
Wacom Tablet Support
HP Anyware supports Wacom tablets in two configurations: bridged, where peripheral data is sent to the desktop for processing, and locally terminated, where peripheral data is processed locally at a PCoIP Software Client or a PCoIP Tera2 Zero Client. Some of the advantages of using HP Anyware in conjunction with Wacom tablets include:
- The ability to interact with your Wacom tablet in a remote environment as if using a deskside workstation.
- Increase the flexibility and footprint of your VFX or video editorial pipelines by centralizing your workstations and providing WAN access for remote artists or satellite studios.
- It dramatically increases your deployment options by enabling your artists with public cloud remote workstations.
The Benefits of Local Termination
While Wacom tablets offer reasonable interactivity in bridged mode at latencies up to 25ms, locally termination greatly improves the responsiveness and tolerance for higher-latency (including 25ms and higher) network connections. High interactivity is very important for artists using Wacom tablets. Local termination presents an immediate local cursor to assist hand-eye coordination in addition to bridging parameters such as pen position, pressure and angle.
For information on which Wacom tablet models are supported with local termination on a PCoIP Software Client and PCoIP Tera2 Zero Client, see Locally Terminated Wacom Tablets - Windows, Locally Terminated Wacom Tablets - Linux and Locally Terminated Wacom Tablets - macOS.
Webcam Support
The PCoIP Software Client for Windows supports certain Webcam models. You must have a PCoIP Software Client 21.03 or higher and PCoIP Agent 21.03 or higher installed to enable these Webcam models. For detailed information on which models are supported and the performance metrics associated with these models, see here. This KB article also details steps on how to test and verify other Webcam models.
Webcams may consume significant network bandwidth in the upstream direction from the endpoint with the webcam to the remote desktop. Depending on the webcam model and resolution, the bandwidth requirement to achieve~ 30 frames per second may be anywhere between 17 Mbps and 40 Mbps. Note that if network bandwidth availability is limited, the frame rate of the webcam is scaled back accordingly.
This feature is enabled by default.
Requirements
Webcam support in HP Anyware requires the following:
- PCoIP Software Client for Windows or PCoIP Software Client for Linux, 21.07+
- PCoIP Standard Agent for Windows or PCoIP Graphics Agent for Windows, 21.03+
- USB-attached webcam
Notes and Limitations
- Webcams must be connected via USB. Webcams that are not USB, such as embedded laptop webcams, are not supported.
- Linux agents are not supported.
- PCoIP Software Client for macOS is not supported.
Setup
On the PCoIP Software Client, connect the webcam as described in the following sections:
- PCoIP Client for Windows: USB Bridging of Webcams.
- PCoIP Client for Linux: USB Bridging of Webcams.
Work-From-Home Support
HP Anyware enables remote access to Windows or Linux based remote workstations including:
- Physical workstations or standalone computers (either deskside or centralized).
- Virtual workstations on VMware ESXi;,KVM or Nutanix AHV Hypervisors.
- Non-graphics virtual desktops on VMware ESXi; Redhat KVM or Nutaniz AHV Hypervisors.
- Remote workstations that reside on the public cloud.
HP Anyware is ideally positioned to manage and provide solutions to your pressing coporate work-from-home demands. For an in-depth view of our work-from-home offerings, please see our Work-from-Home Rapid Response Guide.
This guide outlines: