Installing the Cloud Access Connector
The following section outlines how to download and install the Connector. There are three steps involved in this process:
- Downloading the Connector installer files.
- Obtaining an authorization token.
- Installing the Connector.
Prerequisite Steps
For instructions and documentation on the Connector prerequisite steps, see Connector System Requirements.
It is important to read and address all the prerequisites outlined.
1. Downloading the Connector
The following section outlines how to download the installer files for the Connector. First, connect to the machine and download the Connector files. The commands below will download the Connector archive, and extract it.
You need to ensure that you have a customer account created on teradici.com to access the download information.
Downloading the Installer from teradici.com
The following steps outline the current process that enables you to download the installer directly from teradici.com as a tar.gz file or else run the shell script from teradici.com:
- SSH into the machine:
ssh <username>@<server-ip-address>
- Download the installer from Teradici:
- Open a web browser and navigate to the Downloads and Scripts tab on the Teradici support site.
- Download the installer and upload it to the machine or run the shell script provided to download the installer to the machine.
- Unpackage the installer:
- Previously the installer was extracted into the ~/v2connector directory. This location has now changed. Run the following command to extract the installer to /usr/sbin/:
sudo tar xzvf <PATH TO FILE>/cloud-access-connector_<version>_Linux.tar.gz -C /
- Previously the installer was extracted into the ~/v2connector directory. This location has now changed. Run the following command to extract the installer to /usr/sbin/:
2. Obtaining the Connector Token
You are required to have a Connector token when installing the Connector. You need to create or have created a deployment prior to obtaining a token. For information on how to log into the Admin Console, see Admin Console Connection. The following section outlines how to obtain a Connector token using the Admin Console:
- Click Connectors from the console sidebar.
- Click the add connector button (+ sign located beside Connectors heading) to display the connector creation panel.
- Enter the following information:
- Select the deployment you want to add the Connector to. If you do not have an existing deployment you need to create one.
- Enter the name of the Connector.
- Follow the step by step instructions outlined below.
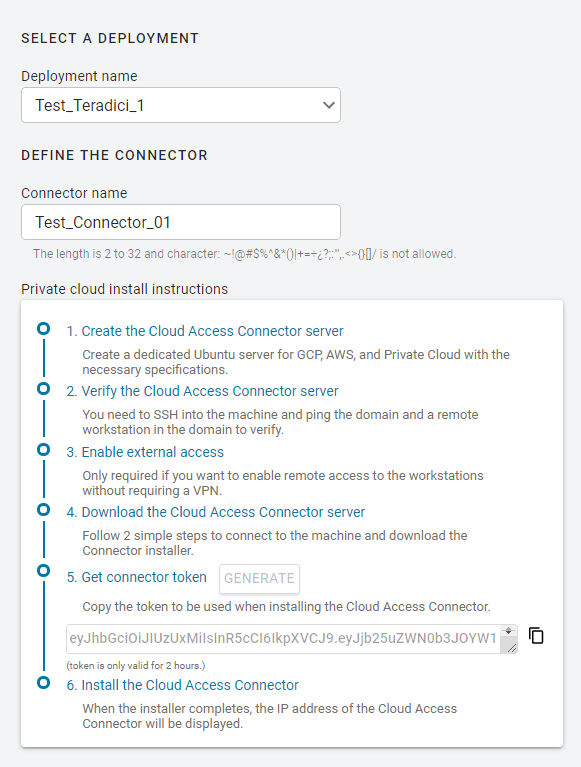
- Click GENERATE.
- Copy the Connector token by click the copy icon.
- Click CLOSE the exit the panel.
You can now use this Connector token when prompted during installation.
3. Installing the Connector
Once the files are downloaded and the access token is set, you can install the Connector. If you are not already connected, connect to the machine via SSH and navigate to the /usr/sbin directory.
Latest Installer Version
Ensure that you are using the latest installer prior to installing or upgrading the Connector. If you are not using the latest installer, you may see one of the following errors or warnings:
- The installer is out of date. Please obtain the latest version and try again. See Downloading the Connector for instructions.
- The installer is out of date. Please download the latest version from teradici.bintray.com/cloud-access-connector/cloud-access-connector-0.1.1.tar.gz and try again.
- A newer version is available. Please go to Downloading the Connector to obtain the latest.
For information on troubleshooting Connector installer issues related to this distribution change, see Installer Issues.
DNS and Name Resolution
You must ensure that you can resolve your AD domain and controller. For information on how to install and edit resolve.conf, and configure DNS name resolution, see Configuring DNS Name Resolution.
3.1 Installing the Connector for CAS Manager
Once you have downloaded the Connector installer and have obtained a Connector token, run the following command to install Connector to the CAS Manager instance you have just installed. The first line of this command maps the Connector token to a variable in the shell:
export token=<token from CAS Manager admin console>
sudo cloud-access-connector install \
-t $token \
--casm-url=https://ip-address-of-cas-manager \
--external-pcoip-ip public.ipv4.clients.connect.to \
--casm-insecure
- When you are installing the Connector for CAS Manager you need to ensure that you enable and specify the
--casm-urlflag. This flag specifies the CAS Manager URL that the Connector connects to. If it is not specified by default it will point to https://cas.teradici.com. - The
--external-pcoip-ipflag is highly recommended to use in order to explicitly set the public IP that PCoIP Clients will connect to during PCoIP sessions. This is the public IP that the Connector is listening to on port 4172. The installer will reach out to cas.teradici.com and first try to automatically resolve the external IP; if this fails, or is not able to resolve the correct IP, this flag is required. In the case that the Connector machine doesn't have an internet connection, for example in a dark site environment, or the ingress and egress internet traffic are running through different public IPs, this flag is required. - The
--casm-insecureflag is only required when the Connector is connecting to a CAS Manager that is using self-signed certificates. If CAS Manager is using trusted TLS certificates signed by a public CA, then users will not need to use the--casm-insecurecommand. For more information on configuring custom trusted certificates for CAS Manager, see TLS Certificates. - The
-casm-ca-certflag can used to provide the PEM formatted public certificate for the private CA used to sign the CAS Manager certificate. This flag is useful if the Connector fails to fetch a certificate from the CAS Manager.
Ensure that you use the options and flags that best suit your system architecture and requirements. If required values are not provided on the command line, you will be prompted for them. For additional flags and options, see Installation Flags and Options.
3.2 Installing the Connector for CAS Manager as a Service
Install the Connector for CAS Manager as a Service by running the following command:
cd /usr/sbin
sudo ./cloud-access-connector install
Ensure that you use the options and flags that best suit your system architecture and requirements. If required values are not provided on the command line, you will be prompted for them. For additional flags and options, see Installation Flags and Options.
Installing the Connector for Testing with CAS Manager
To install the Connector with MFA enabled and in insecure mode for testing, you would run this command (note that we are providing the --enable-mfa flag but not the RADIUS server information, so prompts will appear to collect it):
sudo ./cloud-access-connector install -t $token --enable-mfa --self-signed
When the installer completes, the IP address of the Connector will be displayed and you will be directed to go to https://cas.teradici.com to begin managing your deployments, connectors and remote workstations.
Cloud Access Connector - Troubleshooting
If there is an issue installing the Cloud Access Connector or an existing Connector is failing, please see the troubleshooting section on Cloud Access Connector Connectivity. Within this section there are steps to check the following:
- Remote Workstation connections
- Active Directory connections
- Cloud Access Connector component information
Installation Flags and Options
The following flags can be used to provide values at the command line. If they are omitted from the command and are required, you will be prompted for them:
| Flag | Type | Description |
|---|---|---|
| CAS Manager | ||
--casm-url |
String | Required for CAS Manager, Specifies the CAS Manager URL that the Connector connects to. If this is not specified it will point to https://cas.teradici.com by default, which is the URL for CAS Manager as a Service. |
--casm-ca-cert |
String | Enables users to supply a CA certificate for CAS Manager to enable the Connector to connect to a CAS Manager instance using self-signed certificates. |
--casm-insecure |
String | Is required when the Connector is connecting to a CAS Manager instance that is using self-signed certificates. If CAS Manager is using trusted TLS certificates signed by a public CA, then users will not need to use the this command. |
--ldaps-ca-cert |
String | Enables users to supply a CA certificate for the connection to Active Directory over LDAPS. |
‑‑self-signed |
String | Installs the Connector with self-signed certificates. This mode is not secure and is intended for testing. The --insecure flag is still supported. |
| Connector | ||
--token (-t) |
String | Required. The token generated for CAS Manager. |
‑‑accept‑policies |
— | Automatically accept the EULA and Privacy Policy. |
--force-install |
String | Replaces any existing Connector installation. |
--debug |
String | This flag can be run if you initial install of the Connector fails. It provides a detailed output of the Connector installation. This is useful for self-troubleshooting or to provide to the Teradici support team when logging a support ticket. |
--local-license-server-url |
String | Sets the URL for PCoIP License Server to be used for PCoIP Sessions. If this is not provided, ensure that the Cloud License Server is registered on the PCoIP Agent. Example: --local-license-server-url http://10.10.10.10:7070/request. For more information on the PCoIP License Server, see PCoIP License Server. |
--add-pool-group |
String | Specifies one or more Active Directory groups, by entering the distinguished name (DN), to be assigned to pools for remote workstation management (eg, --pool-group 'CN=GroupPool1,CN=Users,DC=sample,DC=com' --pool-group 'CN=GroupPool2,CN=Users,DC=sample,DC=com'). By providing all the existing pools groups in the Connector settings would get replaced by the user specified ones. When running this command you need to run it with adconfig. Example: sudo ./cloud-access-connector adconfig --add-pool-group. |
--setup-docker-image |
String | Specifies the docker image to be used from the setup container. This is intended to be used for debugging purposes and is not recommended to be used without guidance from Teradici support. Usage without guidance could result in failed installations. |
--docker-registry |
String | This is an optional flag that enables users to specify the docker image registry that they want to use when installing or updating a Connector. If an option is not specified, the default registry docker.cloudsmith.io/teradici/cloud-access-connector will be used. This is intended to be used for debugging purposes and is not recommended to be used without guidance from Teradici support. Usage without guidance from Teradici could result in failed installations. |
--prune-image |
Boolean | Removes all unused docker images on this machine to reclaim more disk space. Warning: This command will remove all unused images under Connector and other services, if any. This is equivalent to the docker image prune command. |
| Firewall | ||
--https-proxy |
String | Specify the URL for a HTTPS proxy (overrides related proxy settings in environment variables) |
--connector-network-cidr |
String | This is the CIDR to use for the Connector's docker network. The default docker network subnet is 10.101.0.0/16. |
--internal-client-cidr |
String | The CIDR for PCoIP Clients that connect to remote workstations directly. It is possible to specify multiple --internal-client-cidr networks. |
--external-client-cidr |
String | The CIDR for PCoIP Clients that connect to remote workstations through the Security Gateway. If external CIDRs settings are set, internal settings must be explicitly set. It is possible to specify multiple --external-client-cidr networks. |
| PCoIP Software Client | ||
--retrieve-agent-state |
Boolean | Enables the broker to retrieve the agent state for unmanaged and managed remote workstations. The default value for this flag is false. The available states are In Session, Ready, Starting, Stopping, Stopped and Unknown. The value of this flag can either be true or false. |
--show-agent-state |
Boolean | Controls if the agent state is displayed as part of the remote workstation name in the PCoIP Client. The default value for this flag is true. Setting the value of this flag to true and the --retrieve-agent-state flag to false will result in no agent state displaying. |
--external-pcoip-ip |
String | Sets the public IP for PCoIP Client to PCoIP Agent connection. This is the public IP that the Connector is listening to on port 4172. The installer will reach out to cas.teradici.com and first try to automatically resolve the external IP; if this fails, or is not able to resolve the correct IP, this flag is required. In the case that the Connector machine doesn't have an internet connection, for example in a dark site environment, or the ingress and egress internet traffic are running through different public IPs, this flag is required. For more information on external network access, see Enabling External Network Access. |
| Domain | ||
‑‑domain |
String | The AD domain that remote workstations will join. |
‑‑sa‑user |
String | The Active Directory service account username. |
‑‑sa‑password |
String | The Active Directory service account password. |
--domain-controller |
String | Specifies one or more domain controllers to use with the Connector. |
--users-filter |
String | The filter to search for users within Active Directory. Specify multiple filters with multiple options. Default user filter: (&(objectCategory=person)(objectClass=user)). |
--computers-filter |
String | The filter to search for computers within Active Directory. Specify multiple filters with multiple options. Default computer filter: (&(primaryGroupID=515)(objectCategory=computer)). |
‑‑users-dn |
StringArray | The base DN to search for users within AD. Specify multiple DNs with multiple options. Newly provided base DN(s) will automatically replace previous base DN(s). This field is looking for user's within the user-defined DN and SGs. |
--computers-dn |
StringArray | The base DN to search for computers within AD. Specify multiple DNs with multiple options. Newly provided base DN(s) will automatically replace previous base DN(s). |
--sync-interval |
uint8 | The interval (in minutes) for how often to sync AD users and computers with the CASM Service. |
| MFA | ||
‑‑enable‑mfa |
String | Installs with multi-factor authentication enabled. |
‑‑radius‑server |
String | The FQDN or IP address of the RADIUS server to use for MFA. This flag is optional. |
‑‑radius‑port |
String | The RADIUS server port. If not specified, the default port (1812) is used. If --radius-server is specifed then this flag is optional. |
‑‑radius‑secret |
String | The shared secret used for configuring RADIUS authentication. If --radius-server is specifed then this flag is required. |
| Certificates | ||
‑‑ssl‑key |
String | The full path and filename of the SSL key to use. The --self-signed flag overrides this flag. |
‑‑ssl‑cert |
String | The full path and filename of the SSL certificate (in PEM format) to use. The --self-signed flag overrides this flag. |
Troubleshooting the Connector
If you encounter issues when attempting to install the Connector, please see the Troubleshooting section for information on how to potentially diagnose the specific issue. You can also view the following KB article here which provides a list of troubleshooting steps for common issues related to installing the Connector. For information on installer errors related to a change in the distribution system, see Installer Issues.
4. Connecting to a Remote Workstation with a PCoIP Client
After successfully installing a Connector, you can initiate a session to connect to a remote workstation with a PCoIP Software Client. Teradici enables customers to use multi-factor authentication for these PCoIP Client sessions. The following steps outline how to connect to a remote workstation using the PCoIP Software Client:
- Double-click the PCoIP Client desktop icon or program file PCoIPClient to launch the application.
- In the Host Address or Code field, enter one of the following:
- For direct connections, provide the address of the host machine.
- For managed connections, provide the address of the connection manager.
- Click NEXT.
- Select your domain and enter the credentials for the remote workstation. If you have enabled MFA then you will be prompted for the 2nd factor passcode. The method of how this passcode is communicated depends on the provider you used. It is usually either a One Time Password or push notification.
- Click LOGIN.
- If your login is successful you should be able to select the remote workstation and connect to it. Please note that if you have a single remote workstation, that remote workstation is automatically selected and the connection is initiated immeadiately. In this case you will not be presented with a remote workstation selection screen.
For more information about the PCoIP Software Client, please see the following PCoIP Software Client guides: