Provisioning a Remote Workstation
The following section outlines how to provision a remote workstation using the Admin Console.
Pre-Defined Images and Templates
If you wish to use your own custom images or templates, you must create and manage those outside of CAS Manager and create your remote workstation outside of CAS Manager also. Once you have created a remote workstation you can add it to your deployment in CAS Manager for brokering and management.
Before provisioning a remote workstation you need to ensure that the Active Directory domain is correctly configured. This should be a different AD Service Account to the account used when installing the Connector. The AD Service Account needs to have the following permissions:
- Create Computer Objects
- Delete Computer Objects
The permissions on the Computer Objects must be set to:
- Read All Properties
- Write All Properties
- Read Permissions
- Modify Permissions
- Change Passwords
- Reset User Passwords
- Validated write to DNS host name
- Validate write to service principal name
These permissions are required so that the remote workstations are able to join the domain account. Without these permissions the remote workstation will still be provisioned, but there will be an issue when adding it to the domain.
Permissions to Create and Delete Computer Objects
The following section outlines how to add permissions to create and delete computer objects through the OU permissions dialog:
- Go to the security tab of the OU you want to give permissions to.
- Right-click the relevant OU and click Properties.
- Go to the security tab and click Advanced.
- Click Add and browse to your user account. As stated above you need to add the user account to the OU.
- Select This object and all descendant objects and select the following permissions:
- Create Computer Objects
- Delete Computer Objects
- Click OK.
Permissions on the Computer Objects
The following section outlines how to select permissions on the computer objects through the OU permissions dialog:
- Go to the security tab of the OU you want to give permissions to.
- Right-click the relevant OU and click Properties.
- Go to the security tab and click Advanced.
- Click Add and browse to your user account. As stated above you need to add the user account to the OU.
- Limit the Apply Onto scope to Descendant Computer objects and select the following settings:
- Read All Properties
- Write All Properties
- Read Permissions
- Modify Permissions
- Validated write to DNS host name
- Validated write to service principal name
- Click OK.
The validated write to DNS host and service principal name permissions are required so that the DNS record for a remote workstation can be created after it is domain joined.
For information on which Cloud Service accounts can perform certain features, please consult the Service Account Requirements section.
Provisioning a Remote Workstation
You must have a valid cloud service account to enable this feature. The following steps outline how to provision a remote workstation:
- Click Workstations from the Admin Console sidebar.
- Click Create new remote workstation from the add remote workstation icon.

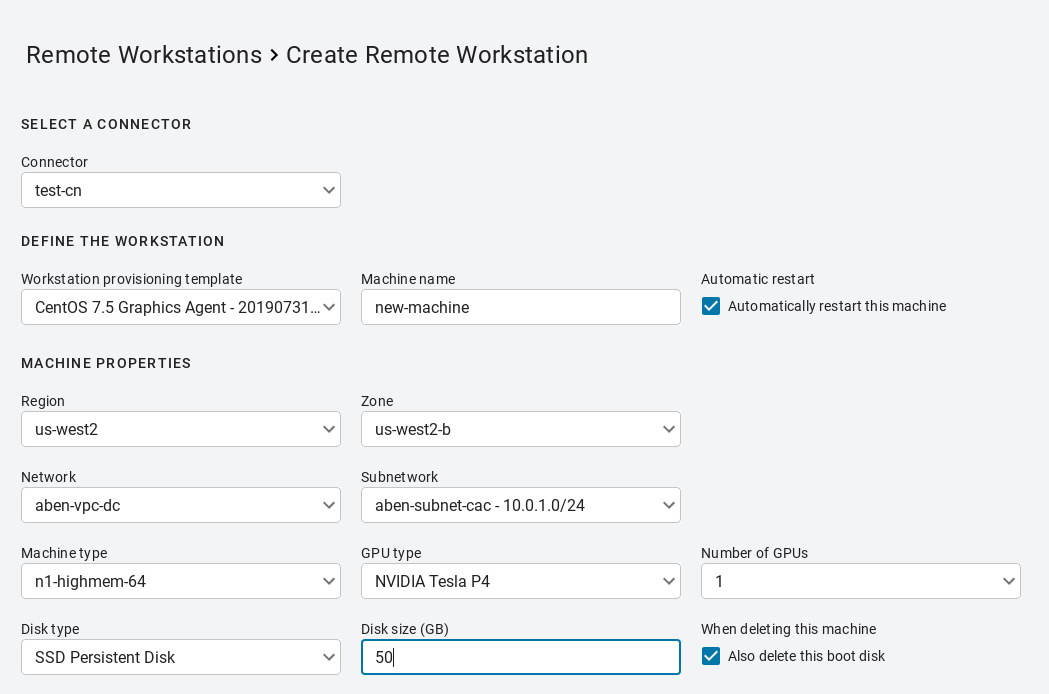
- Select an existing Connector from the dropdown menu.
- Select a provisioning template from the dropdown menu and give your remote workstation a machine name. You can also choose whether you want to enable an automatic restart of the workstation. Compute engine can automatically restart remote workstation instances if they are terminated for non- user intitiated reasons, such as maintenance events, hardware failures, software failures, etc.
-
Enter the remote workstations network, region and disk properties. An example of what this information may look like is shown below:
Public IP or Cloud NAT Requirement
Provisioning will fail unless the machine has a public IP or Cloud NAT.
Remote Workstation Machine Name
Due to NetBIOS and a Windows limitation, the remote workstations machine name must be 15 characters or less. Failure to do this may result in issues with your remote workstation connection.
-
Enter the Active Directory information for the remote workstation. The service account must have permission to join computers to the domain.
- Once you have entered all required information, click CREATE.
The remote workstation will now appear in the table of available machines on the Workstations page.
Active Directory Information
Active Directory information is only used during provisioning to join the remote workstation in question to the domain. This information is not saved by the CAS Manager. The remote workstation is joined to the active directory domain configured in the Connector.
Metadata Retrieval and Storage Information
All provisioned remote workstations have --metadata enable-guest-attributes=TRUE set. This is set to facilitate the passing of data at provisioning time. For more information, see https://cloud.google.com/compute/docs/storing-retrieving-metadata.
IdleShutDown Agent Configuration
IdleShutDown Agent is configured so that the remote workstation will shutdown when it is idle. For more information on installing and configuring this feature, see Configuring Idle Shutdown.