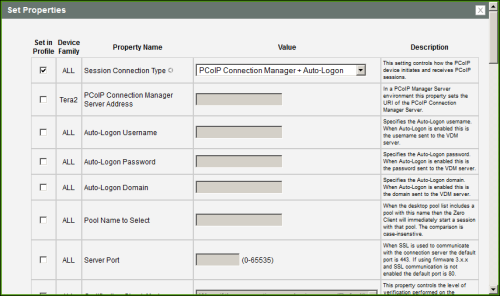
Select the PCoIP Connection Manager + Auto-Logon session connection type from the MC to configure a profile to automatically enter users' login details when a PCoIP Connection Manager is used as the PCoIP session broker.
This selection requires a device restart after being changed.
Important! Passwords are stored locally in retrievable form when zero clients are configured with this session connection type. For this reason, it should not be used in high security environments. Ensure that you take precautions to prevent theft of the zero client if you do use this session connection type.
Note: To enable a property in the MC, click the Set in Profile check box and configure the fields as indicated. After you update the properties on this page, click Save to save your changes.
MC Session Connection Type – PCoIP Connection Manager + Auto-Logon
MC Session Configuration Parameters
| Parameter | Description |
|---|---|
|
PCoIP Connection Manager Server Address |
Enter the Uniform Resource Identifier (URI) for the PCoIP Connection Manager. Note: The URI must be in the form "https://<hostname|IP address>". |
|
Auto-Logon Username |
Enter the username for the client (maximum number of characters is 128). This username will be sent to the specified connection server. |
|
Auto-Logon Password |
Enter the password for the client (maximum number of characters is 128). This password will be sent to the specified connection server. |
|
Auto-Logon Domain |
Enter the domain for the client (maximum number of characters is 256). This domain will be sent to the specified connection server. |
|
Pool Name to Select |
Enter the desktop name used by the client when starting a session. Note: This field is case-insensitive. |
|
Server Port |
By default, port 443 is used to communicate with the connection server. If your network is set up to use a non-standard port for secure connections, enter the port number. |
|
Certification Check Mode |
Select the level of verification performed on the certificate presented by the connection server:
|
|
Certification Check Lockout Mode |
Select whether to lock or unlock Certification Check Mode:
|
|
Auto Connect Mode |
This field determines the client's auto connect behavior after startup:
Note: Devices running firmware 4.1.1 or lower do not support Retry On Error behavior and will always perform a single attempt to contact the connection server when this option is selected. |
|
Connection Server Cache Mode |
Enable the desired number of fields (up to 25) that may appear in the cache on a user's OSD Connect page, and for each one, enter a PCoIP Connection Server URI to which a user is allowed to connect.
|
|
PCM Server Cache Entry (1 to 25) |
Enable the desired number of fields (up to 25) that may appear in the cache on a user's OSD Connect page, and for each one, enter a PCoIP Connection Server URI to which a user is allowed to connect.
|
| Auto Launch If Only One Pool |
When enabled, users are automatically connected to a provisioned desktop or application after user credentials are entered. |
|
Use OSD Logo for Login Banner |
When enabled, the OSD logo banner appears at the top of login screens in place of the default banner. You can upload an OSD logo from the OSD Logo Upload page. |
|
Enable Peer Loss |
When enabled, the “Network Connection Lost” overlay appears on the display(s) when a loss of network connectivity is detected. Normal hypervisor scheduling delays can falsely trigger this message. Note: This option is only available for a zero client. Desktop applications that require the peer loss notification should re-enable the feature through the OSD, AWI, or MC. |
|
Enable Preparing Desktop Overlay |
When enabled, the "Preparing Desktop" overlay appears on the display(s) when users log in. Note: This overlay provides assurance that login is proceeding if the desktop takes more than a few seconds to appear. |
|
Enable Session Disconnect Hotkey |
When enabled, users can press the Ctrl+Alt+F12 hotkey sequence to pop up the "Zero Client Control Panel" overlay, which lets them disconnect the current session on the workstation or power off the workstation. Note: Before users can use this disconnect hotkey sequence, certain other configuration options must be in place. See Disconnecting from a Session for details. |
|
PCoIP Utility Bar Mode (Tera2 zero clients only) |
When enabled, the PCoIP Utility Bar appears at the top of the primary display when a user is in session and moves the cursor directly under the bar. The utility bar can be used to disconnect a session or to shut down a remote workstation. For Direct to Host session connection types, Local Cursor and Keyboard must be enabled in order for the zero client to process mouse events for the utility bar. For all connection types, the mouse must be locally connected (i.e., not bridged).
Note: This feature is configurable from the MC and AWI only. It requires firmware version 4.2.0 or newer. |
| Disconnect Dialog Display Mode |
This field lets you control what type of messages appear when a session is disconnected. There are three categories: Information: User- or administrator-initiated actions affecting the session:
Warning: System-initiated, but expected actions affecting the session:
Error: Unexpected system-initiated actions causing session to fail:
Note: For detailed information about the above session disconnect codes, please see KB 15134-872 in the Teradici Support Site. You can choose to display:
|
|
Session Lost Timeout |
Enter the timeout (in seconds) for the connection of the active session. The valid timeout range for this field is 5 to 60 seconds. The session will be disconnected when this timeout period expires. |
|
Enable DSCP |
When enabled, the device populates the Differentiated Services Code Point (DSCP) field in the IP header, allowing intermediate network nodes to prioritize PCoIP traffic accordingly. |
|
Enable Transport Congestion Notification |
When enabled, transport congestion notification is enabled to allow PCoIP endpoints to react accordingly if an intermediate network node sets the congestion notification bit in either the IP header or PCoIP transport header. Note: For more information about the PCoIP transport header, see PCoIP Packet Format. |