Teradici PCoIP Standard Agent 2.13.0 for Linux (Ubuntu) Quick Start Guide
This quick start guide is intended for administrators who are deploying the PCoIP Standard Agent on Linux (Ubuntu) systems, who want to get started with minimal configuration. It does not account for special cases, unique configuration requirements, or optional system components.
This quick start guide covers:
- PCoIP Standard Agent Requirements
- Before You Begin
- Installing the PCoIP Standard Agent on Ubuntu
- Connecting to Your Host Desktop Using a Teradici PCoIP Software Client
To understand the conventions and terms used in this guide, see Using Teradici Product and Component Guides and the Teradici Glossary.
PCoIP Standard Agent Requirements
- A host machine which provides the desktop to remote clients.
- The PCoIP Standard Agent software installed on the host machine.
-
KDE Desktop Environment. To install, use this command:
sudo apt install kubuntu-desktop
For compatibility details, see Linux system requirements in the Teradici PCoIP® Standard Agent 2.13 for Linux Administrators' Guide.
Before You Begin
Before starting, ensure the following requirements are met:
-
SSH is enabled.
-
You must have a license registration code from Teradici.
-
You must have super user (root) privileges.
-
The following ports must be available on the host workstation: TCP 443, TCP 60443, TCP 4172, and UDP 4172.
Installing the PCoIP Standard Agent on Ubuntu
To install the PCoIP Standard Agent software:
- Install the Teradici package key (one command):
sudo apt-key adv --keyserver pool.sks-keyservers.net --recv-key 67D7ADA8
- Add the Teradici repository (one command):
sudo wget -O /etc/apt/sources.list.d/pcoip.list https://downloads.teradici.com/ubuntu/pcoip.repo
- Install the PCoIP Standard Agent:
sudo apt update
sudo apt install pcoip-agent-
- Note your machine's local IP address. Clients connecting directly to the host workstation will need this number to connect.
-
Enter the license registration code you received from Teradici.
Note: These instructions are for Cloud Licensing These instructions assume you are using Teradici Cloud Licensing to activate your PCoIP session licenses. If you are using the Teradici License Server instead, see the detailed instructions in the Teradici PCoIP® Graphics Agent 2.13 for Linux Administrators' Guide.
-
For unproxied internet connections, type:
pcoip-register-host --registration-code=<XXXXXX@YYY-YYYY-YYY>
-
For proxied internet conections, type (one command):
pcoip-register-host --registration-code=<XXXXXX@YYY-YYYY-YYY>
--proxy-server=<serverURL> --proxy-port=<port>
-
- Reboot the Linux instance.
| Note: No local graphical user interface | |
|
Once installed and running, the PCoIP Standard Agent takes over the graphics subsystem which is then unavailable to hypervisors. You can only view the graphical user interface when connecting with a PCoIP client. For example, you cannot view an ESXi virtual machine console through VSphere; you must connect to the machine using PCoIP. |
Connecting to Your Host Desktop Using a Teradici PCoIP Software Client
To connect to your host workstation using a PCoIP Software Client:
- Start the PCoIP Software Client.
-
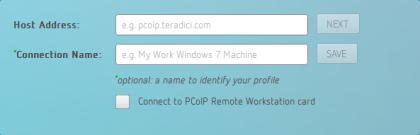
In the Host Address field, enter the IP address of your virtual machine, as shown next:
- Click NEXT.
-
Enter the user name and password you set up for your host workstation when you created it.
The Domain setting can be left unchanged.
- Click CONNECT.
The PCoIP client will establish a PCoIP connection to your host workstation.
For more information about PCoIP client connectivity requirements, refer to the Teradici PCoIP® Software Client 3.6 for Windows Administrators' Guide, Teradici PCoIP® Software Client 3.6 for Mac Administrators' Guide, and the Tera2 PCoIP Zero Client Firmware 6.1 Administrators’ Guide.